Tripp Lite U442DOCK8B Owners Manual for Triple-Display USB-C Docking Station M - Page 17
Non-Video Port Installation
 |
View all Tripp Lite U442DOCK8B manuals
Add to My Manuals
Save this manual to your list of manuals |
Page 17 highlights
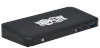
Installation Non-Video Port Installation Note: Be sure the power adapter is properly connected and the power button of the unit is turned on. This should occur once all your devices are properly plugged in. • Connect up to 3 USB-A peripherals including speeds up to 10 Gbps. The BC 1.2- compliant port supports up to 5V 1.5A (7.5W) of charging power. • Connect an Ethernet network through the RJ45 port to achieve speeds up to 10/100/1000 Mbps (1 Gbps). • Connect the 3.5 mm Mini Stereo port to a headset, microphone or speaker. If the audio is not automatically changed to USB Audio Device, open the control panel and select the hardware and sound icon. Then click Sound > Manage Audio Devices and select USB Audio Device. • Transfer data up to 10 Gbps using the USB-C data port. • (Optional) If you have a security-cable chain lock, connect it to the anti-theft lock port. 17
-
 1
1 -
2
-
3
-
4
-
5
-
6
-
7
-
8
-
9
-
10
-
11
-
 12
12 -
 13
13 -
 14
14 -
 15
15 -
 16
16 -
 17
17 -
 18
18 -
 19
19 -
 20
20
 |
 |
