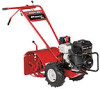
Troy-Bilt Pony ES Operation Manual - Page 10
Wheel Gear Lever, Battery and Cables If equipped with electric start, Tires, Gas & Oil Fill-Up, - transmission service manual
 |
View all Troy-Bilt Pony ES manuals
Add to My Manuals
Save this manual to your list of manuals |
Page 10 highlights
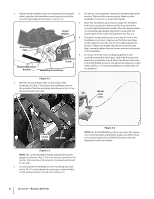
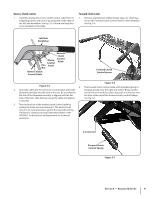
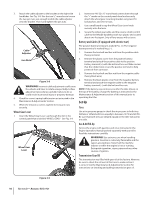
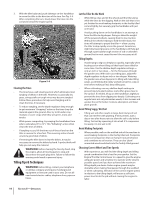
3. Attach the cable adjuster to the bracket on the right-side handlebar. See Fig. 3-8. Use the two 1⁄2" wrenches to loosen the two jam nuts just enough to slide the cable adjuster onto the bracket. Then hand tighten the jam nuts. Cable Adjuster Jam Nuts Figure 3-8 WARNING! Incorrect cable adjustment could cause the wheels and tines to rotate unexpectedly. Follow adjustment procedures carefully. Failure to do so could result in personal injury or property damage. 4. Check for correct spring/cable tension as instructed in the Maintenance & Adjustments Section. 5. When the tension is correct, tighten the two jam nuts securely. Wheel Gear Lever 1. Insert the Wheel Gear Lever up through the slot in the control panel that is labeled "WHEEL GEAR." See Fig. 3-9. Wheel Gear Lever 2. Insert two #10-32 x 1⁄2" round head screws down through the "+" marks on the control panel decal and securely attach the wheel gear mounting bracket using two #10 lockwashers and #10-32 nuts. 3. Use a small board to tap the Wheel Gear Lever knob securely onto the lever. 4. Secure the wheel gear cable and the reverse clutch control cable to the leftside handlebar with two plastic ties located about two feet apart. Snip off any excess with scissors. Battery and Cables (If equipped with electric start) The positive battery terminal is marked Pos. (+). The negative battery terminal is marked Neg. (-). 1. Remove the hex bolt and hex nut from the positive cable (heavy red wire). 2. Remove the plastic cover from the positive battery terminal and attach the positive cable to the positive battery terminal (+) with the bolt and hex nut. Make certain that the rubber boot covers the positive terminal to help protect it from corrosion. 3. Remove the hex bolt and hex nut from the negative cable (heavy black wire). 4. Remove the black plastic cover from the negative battery terminal and attach the negative cable to the negative battery terminal (-) with the bolt and hex nut. NOTE: If the battery is put into service after the date shown on the top of the battery, charge the battery as instructed in the Maintenance & Adjustments section of this manual prior to operating the tiller. Set-Up Tires Use a tire pressure gauge to check the air pressure in both tires. Deflate or inflate both tires equally to between 15 PSI and 20 PSI. Be sure that both tires are inflated equally or the tiller will pull to one side. Gas & Oil Fill-Up Service the engine with gasoline and oil as instructed in the Engine Operator's Manual packed separately with your tiller. Read the instructions carefully. WARNING! Use extreme care when handling gasoline. Gasoline is extremely flammable and the vapors are explosive. Never fuel the machine indoors or while the engine is hot or running. Extinguish cigarettes, cigars, pipes and any other sources of ignition. Transmission Gear Oil The transmission was filled with gear oil at the factory. However, be sure to check the oil level at this time to make certain it is correct. See the Maintenance & Adjustments Section for instructions on checking and adding transmission gear oil. Figure 3-9 10 Section 3- Assembly & Set-Up
-
 1
1 -
2
-
3
-
4
-
 5
5 -
 6
6 -
 7
7 -
 8
8 -
 9
9 -
 10
10 -
 11
11 -
 12
12 -
 13
13 -
 14
14 -
 15
15 -
16
-
17
-
18
-
19
-
20
-
21
-
22
-
23
-
24
-
25
-
26
-
27
-
28
 |
 |
