Troy-Bilt Pony ES Operation Manual - Page 20
Reverse Clutch Belt
 |
View all Troy-Bilt Pony ES manuals
Add to My Manuals
Save this manual to your list of manuals |
Page 20 highlights
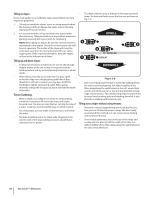
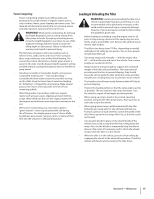
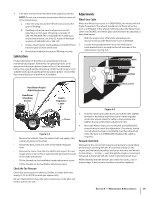
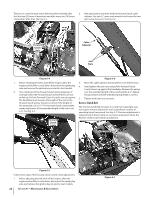
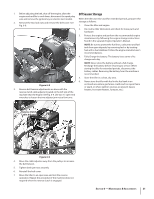
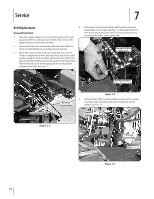
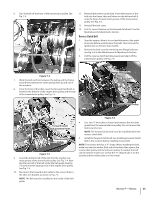
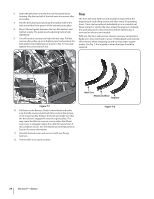
Tension on a new forward clutch belt should be checked after 2. Belt adjustments are done with the forward clutch cable the first two (2) hours of operation and after every ten (10) hours adjuster. Use two 1⁄2", open-end wrenches to loosen the two of operation after that. See Fig. 6-4. jam nuts a few turns. See Fig. 6-6 Forward Clutch Belt Cable Adjuster Jam Nuts Figure 6-4 Figure 6-6 1. Before checking the belts, shut off the engine, allow the 3. Move the cable adjuster downward for more belt tension. engine and muffler to cool down, disconnect the spark plug 4. Hand tighten the jam nuts and pull the Forward Clutch wire and remove the ignition key on electric start models. Control levers up against the handlebar. Measure the spring 2. The coiled part of the forward clutch spring measures 2" coil. The extended length of the coil should be 2-1⁄2". Repeat in length when the Forward Clutch Control levers are not this procedure until the extended spring length is correct. pulled up. Pull the Forward Clutch Control Lever up against 5. Tighten both jam nuts securely. the handlebar and measure the length of the coil on the forward clutch spring. Tension is correct if the length of Reverse Clutch Belt the extended coil is 2-1⁄2". The forward clutch control cable needs adjustment if the extended length of the coil is not 2-1⁄2". See Fig. 6-5. The reverse clutch belt, because it is used more sparingly, may not require tension adjustment until a significant number of operating hours has passed. See Fig. 6-7. A tension adjustment is required only if there is little or no reverse movement when the Forward Reverse Clutch Control knob is pulled out. Clutch Cable Reverse Clutch Belt Figure 6-5 Follow these steps if the forward clutch control needs adjustment. 1. Before adjusting the belt, shut off the engine, allow the engine and muffler to cool down, disconnect the spark plug wire, and remove the ignition key on electric start models. 20 Section 6- Maintenance & Adjustments Figure 6-7
-
 1
1 -
2
-
3
-
4
-
5
-
6
-
7
-
8
-
9
-
10
-
11
-
12
-
13
-
14
-
 15
15 -
 16
16 -
 17
17 -
 18
18 -
 19
19 -
 20
20 -
 21
21 -
 22
22 -
 23
23 -
 24
24 -
 25
25 -
26
-
27
-
28
 |
 |
