Troy-Bilt TB380 Operation Manual - Page 11
Adjustments
 |
View all Troy-Bilt TB380 manuals
Add to My Manuals
Save this manual to your list of manuals |
Page 11 highlights
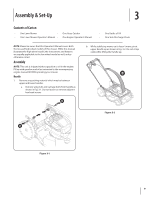
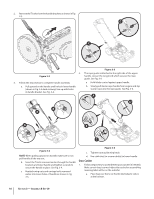
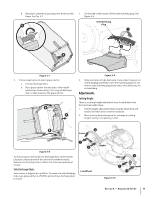
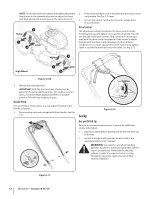
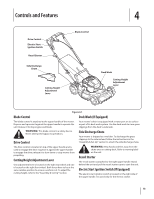
b. Slip plastic channel of grass bag over hooks on the frame. See Fig. 3-7. B 1. On the side of the mower, lift the side mulching plug. See Figure 3-9. Side Mulching Plug 1 2 A Figure 3-7 2. Follow steps below to attach grass catcher: a. Lift rear discharge door. b. Place grass catcher into the slots in the handle brackets as shown in Fig. 3-8. Let go of discharge door so that it rests on the grass catcher. B A Figure 3-9 2. Slide two hooks of side discharge chute under hinge pin on mulching plug assembly. Lower the mulching plug. Do not remove side mulching plug at any time, even when you are not mulching. Adjustments Cutting Height There is a cutting height adjustment lever located above the front and rear right wheel. 1. Pull the height adjustment lever towards wheel (unit will tend to fall when lever is moved outward). 2. Move lever to desired position for a change in cutting height. See Fig. 3-10 and Fig. 3-10A. B 2 Lower Figure 3-8 To remove grass catcher, lift rear discharge door on the mower. Lift grass catcher up and of the slots in the handle brackets. Release rear discharge door to allow it to close rear opening of mower. Side Discharge Chute Your mower is shipped as a mulcher. To convert to side discharge, make sure grass catcher is off of the unit and rear discharge door is closed. 1 3 Low Wheel Higher Higher 2 1 3 Figure 3-10 Lower Section 3 - Assembly & Set-Up 11
-
 1
1 -
2
-
3
-
4
-
5
-
 6
6 -
 7
7 -
 8
8 -
 9
9 -
 10
10 -
 11
11 -
 12
12 -
 13
13 -
 14
14 -
 15
15 -
 16
16 -
17
-
18
-
19
-
20
-
21
-
22
-
23
-
24
-
25
-
26
-
27
-
28
-
29
-
30
-
31
-
32
-
33
-
34
-
35
-
36
-
37
-
38
-
39
-
40
-
41
-
42
-
43
-
44
-
45
-
46
-
47
-
48
-
49
-
50
-
51
-
52
 |
 |
