URC HDA-130 Owners Manual - Page 8
InstallationInstructions
 |
View all URC HDA-130 manuals
Add to My Manuals
Save this manual to your list of manuals |
Page 8 highlights
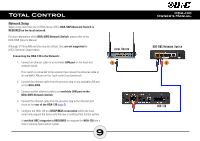
Total Control Installation Instructions The HDA-130 amplifier is supplied with two (2) "L" shaped brackets for mounting on the wall or secure vertical surface. 1. Insert the supplied screws into the two (2) keyed slots on the L shaped bracket (as displayed on the image at the right). This L shaped bracket can be pre-installed and the HDA-130 amplifier can be inserted afterwards. 2. Insert the supplied screws into the four (4) keyed slots for wall mounting. Keyhole Diameter: 0.48"/12.5mm 6 HDA-130 Owner's Manual 1 2
-
 1
1 -
2
-
 3
3 -
 4
4 -
 5
5 -
 6
6 -
 7
7 -
 8
8 -
 9
9 -
 10
10 -
 11
11 -
 12
12 -
 13
13 -
14
-
15
-
16
-
17
-
18
-
19
-
20
 |
 |

6
Total Control
HDA-130
Owner’s Manual
InstallationInstructions
The
HDA-130amplifierissuppliedwithtwo(2)“L”shapedbracketsfor
mounting
on the wall or secure vertical surface.
1.
Insert the supplied screws into the two (2) keyed slots on the L shaped bracket
(as displayed on the image at the right).
This L shaped bracket
canbepre-installed
and the HDA-130 amplifier can be
inserted afterwards.
2.
Insert the supplied screws into the four (4) keyed slots for wall mounting.
Keyhole Diameter: 0.48”/12.5mm
1
2