Uniden CMX760 Owners Manual - Page 16
Attach Bracket/Install Radio
 |
View all Uniden CMX760 manuals
Add to My Manuals
Save this manual to your list of manuals |
Page 16 highlights
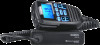
slots. Be sure the slide mount latches face outward. L-Tab (2 on each rail) L-Tab Slot (2 on each side) Slide Mount Latch (1 on each rail) 2. Use the screws provided to fasten the guide rails into position on the radio. Attach Bracket/Install Radio 1. Using the screws provided, screw the bracket into a stable, level surface. If mounting the radio in a vehicle, for example, screw the bracket onto the top of the dashboard or underneath the dashboard. Be sure the words "FRONT-SLIDE IN" are visible from the front of the bracket. Be sure you do not mount the bracket where the screws can damage any wiring or hardware. Move the wiring/hardware out of the way or relocate the radio bracket. 2. Slide the back of the radio into the bracket until the slide mounts latch and click into place. 16
-
 1
1 -
2
-
3
-
4
-
5
-
6
-
7
-
8
-
9
-
10
-
 11
11 -
 12
12 -
 13
13 -
 14
14 -
 15
15 -
 16
16 -
 17
17 -
 18
18 -
 19
19 -
 20
20 -
 21
21 -
22
-
23
-
24
-
25
-
26
-
27
-
28
-
29
-
30
-
31
-
32
-
33
-
34
-
35
-
36
-
37
-
38
-
39
-
40
-
41
-
42
-
43
-
44
 |
 |
