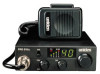
Uniden PRO510XL English Owners Manual - Page 6
Installation - cb pro 510xl
 |
UPC - 050633031131
View all Uniden PRO510XL manuals
Add to My Manuals
Save this manual to your list of manuals |
Page 6 highlights
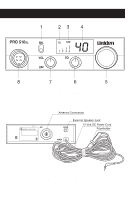
INSTALLATION Plan the location of the radio and microphone bracket before starting installation. Select a location that is convenient for operation and does not interfere with the driver or passenger in the vehicle. The radio should be securely fastened to a solid surface using the mounting bracket and self-tapping screws which are provided. Mobile Antenna Connecting the Power Cord With regard to the connection of the power cords, it may be possible or desirable to connect the red lead (for negative ground systems) or the black lead (for positive ground systems) to the ignition switch accessory terminal so that the radio is automatically turned off when the ignition switch (key) is turned off. Since the maximum allowable power output of the transceiver is limited by the FCC, the antenna is a very important factor affecting the transmission distance. It is for this reason that we strongly recommend that you install only a quality antenna in your new CB radio system. You have purchased a superior quality transceiver. Don't diminish its performance by installing an inferior antenna. Only a properly matched antenna system will allow maximum power transfer from the 50-ohm transmission line to the radiating element. We recommend that you use an SWR meter when installing your antenna. Set your PRO 510XL to channel 20 and make your adjustments to the antenna until the meter reads as close to 1 as possible. Your Uniden dealer is qualified to assist you in the selection of the proper antenna to meet your application requirements. For automobile installation, the whip antenna may be used with good effect. The most efficient and practical installation is a full quarter wave whip antenna mounted on the rear deck or fender top, midway between the rear window and bumper. A short "loaded" whip antenna maybe more convenient to install on your automobile, although the efficiency is less than a full quarter wave whip antenna. For marine installation, consult your dealer for information regarding an adequate grounding system and prevention of electrolysis between fittings on the hull and water. Alternately, the power lead may be connected to an available terminal on the fuse block or even to a point in the wiring harness. Care must be taken, however, to guard against a short circuit condition. When in doubt, please contact your vehicle dealer fro specific information about your vehicle. Ground Information Most newer U.S. and foreign made cars and small trucks use a negative ground system, while some older cars and some newer larger trucks may use a positive ground system. A negative ground system is generally identified by the "-" battery terminal being connected to the vehicle motor block, but if you cannot determine the polarity of your vehicle, consult your vehicle dealer for information. NOTE: This radio may be installed and used in any 12-volt DC negative or positive ground system. Negative Ground System If you are operating on a negative ground system, connect the red DC power cord from the radio to the positive "+" battery terminal or other convenient point and connect the black power lead to the chassis or vehicle frame, or the " -" terminal of the battery. Positive Ground System If you are operating on a positive ground system, connect the black DC power cord from the radio to the "-" battery terminal or other convenient point and connect the red power lead to the chassis or vehicle frame, or the positive "+" terminal of the battery.
-
 1
1 -
 2
2 -
 3
3 -
 4
4 -
 5
5 -
 6
6 -
 7
7 -
 8
8 -
 9
9 -
 10
10 -
 11
11 -
 12
12
 |
 |
