Vaddio ProductionVIEW HD ProductionVIEW HD Manual - Page 11
Lower Screen Graphics
 |
View all Vaddio ProductionVIEW HD manuals
Add to My Manuals
Save this manual to your list of manuals |
Page 11 highlights
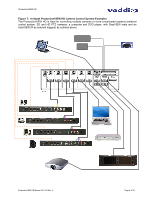
ProductionVIEW HD Lower Screen Graphics Preparing to display Lower Screen Graphics on ProductionVIEW HD, first select your "background" video input (typically a live camera) on the Program bus, and then select the input that has the computer graphics that are to be displayed, on the Preview bus. In the example to the right, the background is Input 1 on Program, and the computer is on Input 6. To initiate the Lower Screen Graphic, press one of the LSG buttons on either bus, and the graphic will appear. Transparency Level: To increase or decrease the transparency of the graphic overlay, press and hold the Transparency Level button down. The system will toggle through the levels to allow the user to select the level that is appropriate for the graphics. Lower Screen Size: To increase or decrease the size of the graphic overlay, press and hold the Lower Screen Size button. The system will toggle through the sizes (bottom or full screen), to allow the user to select the level that is appropriate for the graphics that have been created. Increasing/Decreasing Transparency Level and Lower Screen Size: When LSG is activated, pressing the PIP Upper Left Button will allow both Transparency Level and Lower Screen Size to increase when either button is pressed. Pressing the Lower Left PIP button will allow the LSG controls to decrease to decrease when either button is pressed. Note: This feature does not work in Dual Bus mode. LSG In Dual Bus Mode: In Dual Bus Mode, where seamless switched outputs with effects and transitions can be delivered out of both the Preview and Program outputs, select the Input on each bus that will be the "background" image. Next, select the input that has the computer graphics that will be displayed (the second button that is pressed on each bus will flash). Press the LSG buttons on the Program and Preview buses. The graphics will placed on each output seamlessly. LSG Presets: Preset configurations for LSG can be set up utilizing the Camera Preset buttons in the upper right of the console. Up to 12 preset configurations of lower screen size and transparency level can be programmed. To do this, with LSG mode turned on, simply set a Lower Screen Size and Transparency Level. Next, press and hold one of the 12 Camera Preset buttons for approximately 4 seconds. The Lower Screen Size and Transparency Level will be stored in that preset position, much like a camera preset can be stored in the system. Change the Transparency Level and/or Size and store the new preset in one of the other 12 Camera Preset selector buttons. A total of 12 LSG presets can be stored in the system. The last LSG preset position displayed will be the one recalled when LSG is turned back on. Currently, the preset positions for the LSG can only be changed when LSG is turned on. Note: A DVD containing sample graphics in both Keynote and PowerPoint is supplied with ProductionVIEW HD. The sample graphics provide users with an easy way of getting started creating graphics for their own live productions. ProductionVIEW HD Manual 341-759 Rev. C Page 11 of 24
-
 1
1 -
2
-
3
-
4
-
5
-
 6
6 -
 7
7 -
 8
8 -
 9
9 -
 10
10 -
 11
11 -
 12
12 -
 13
13 -
 14
14 -
 15
15 -
 16
16 -
17
-
18
-
19
-
20
-
21
-
22
-
23
-
24
 |
 |
