Vaddio RoboSHOT 30 HDMI White User Guide - Page 19
Screen Shot, Camera Control
 |
View all Vaddio RoboSHOT 30 HDMI White manuals
Add to My Manuals
Save this manual to your list of manuals |
Page 19 highlights
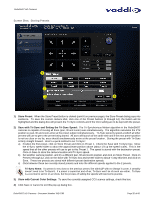
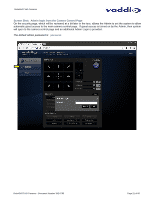
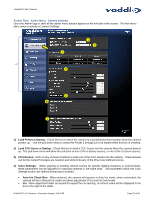
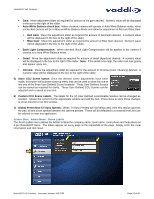
RoboSHOT HD Cameras Screen Shot: Camera Control Page This web page provides access to the camera controls for the User and the Admin. ➊➋ ➌ ➒ ➍ ➎ ➏ ➐ ➑ 1) Pan, Tilt and Home Controls: These intuitive controls use the up/down and diagonal arrows for camera pan and tilt. The center button will move the camera to the home position. 2) Zoom Control: The camera's zoom lens can be controlled with the "+" to zoom-in and the "-"to zoom out. 3) Standby: The Standby control puts the camera in low power mode and effectively puts the RoboSHOT to sleep. If the system is on, then the button will be blue and controls will be visible. If the button is red, no controls are accessible and the screen states: Device is in standby. Click to power-up, then you'll know what to do. 4) The Focus and Settings Buttons: Clicking the Focus button opens pop-up window that lets the user set auto or manual focus with Near/Far controls. Clicking the Settings button opens a pop-up window that allows the user to reverse either the pan or tilt direction or both. 5) Pan/Tilt and Zoom Speed Controls: The speed for both the Pan/Tilt and Zoom controls can be adjusted with the three (3) sliders in this section. For tighter shots, it is recommended that the slower speed is used. These controls are for realtime camera movements only. 6) Camera Presets: Twelve (12) camera position presets can be recalled simply by clicking a preset number. 7) Store Preset Button: Clicking the Store button opens up a Store Preset pop-up dialog box. To set presets, set up the camera shot, click on choice of preset number (1 through 12). The preset is stored and the dialog box closes. The Store Preset dialog bow will prompt the operator to enter the Tri-Sync speed to the stored camera preset and if the current color settings are to be stored with the preset too (see the next page). 8) CCU Scenes: The user has access to the CCU scenes set and stored on the Admin pages. There are three (3) user definable presets and six (6) presets preconfigured by the technical folks at Vaddio (really Scott set them all) that are meant to be used in certain lighting scenarios. These lighting presets included: Automatic, Incandescent Hi, Incandescent Lo, Fluorescent Hi, Fluorescent Lo and Outdoor. 9) Administration Menu: By clicking on the Administration menu bar, the Admin Login screen will appear. RoboSHOT HD Cameras - Document Number 342-0793 Page 19 of 60
-
 1
1 -
2
-
3
-
4
-
5
-
6
-
7
-
8
-
9
-
10
-
11
-
12
-
13
-
 14
14 -
 15
15 -
 16
16 -
 17
17 -
 18
18 -
 19
19 -
 20
20 -
 21
21 -
 22
22 -
 23
23 -
 24
24 -
25
-
26
-
27
-
28
-
29
-
30
-
31
-
32
-
33
-
34
-
35
-
36
-
37
-
38
-
39
-
40
-
41
-
42
-
43
-
44
-
45
-
46
-
47
-
48
-
49
-
50
-
51
-
52
-
53
-
54
-
55
-
56
-
57
-
58
-
59
-
60
 |
 |
