ViewSonic LS810 LS810 User Guide English - Page 45
Adjusting the sound, Switch off the projector
 |
View all ViewSonic LS810 manuals
Add to My Manuals
Save this manual to your list of manuals |
Page 45 highlights
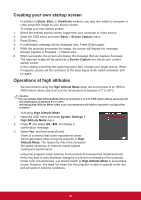
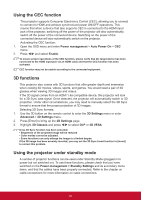
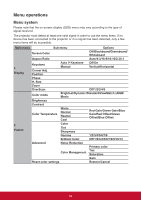
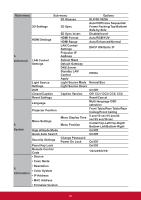
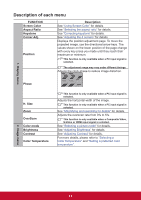
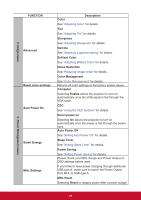
Active VGA Out Once the COMPUTER IN and COMPUTER OUT jacks have been properly connected to the corresponding devices, select ON to generate VGA signal output. The projector will only receive output signals via Computer In 1. Active Audio Out When the AUDIO IN jack is correctly connected to a device, select ON to output audio signals. Adjusting the sound The sound adjusents made as below will have an effect on the projector speaker(s). Please check that you have made a correct connection to the projector audio input / output jacks. See "Connection" for details. Adjustments in Audio Mode 1. Open the OSD menu and enter Basic > Audio Settings > Audio Mode menu. 2. Press / to select the primary Audio Mode. If available, you may press the [Audio Mode] on the remote control to select the primary Audio mode. Mute 1. Open the OSD menu and enter Basic > Audio Settings > Mute menu. 2. Press / and select ON. If available, you may press the ON or OFF. button on the remote control to switch the projector audio Adjusting the sound level 1. Open the OSD menu and enter Basic > Audio Settings > Audio Volume menu. 2. Press / to select the desired volume. If available, you may press the the projector. button on the remote control to adjust speaker volume of Switch off the projector 1. Press the Power button. A confirmation message will be displayed on screen. The message will disappear if you do not respond within a few seconds. 2. Press the Power button again. 3. Disconnect the power cord from the wall socket if the projector will not be used in an extended period of time. 38
-
 1
1 -
2
-
3
-
4
-
5
-
6
-
7
-
8
-
9
-
10
-
11
-
12
-
13
-
14
-
15
-
16
-
17
-
18
-
19
-
20
-
21
-
22
-
23
-
24
-
25
-
26
-
27
-
28
-
29
-
30
-
31
-
32
-
33
-
34
-
35
-
36
-
37
-
38
-
39
-
 40
40 -
 41
41 -
 42
42 -
 43
43 -
 44
44 -
 45
45 -
 46
46 -
 47
47 -
 48
48 -
 49
49 -
 50
50 -
51
-
52
-
53
-
54
-
55
-
56
-
57
-
58
-
59
-
60
-
61
-
62
-
63
-
64
-
65
-
66
-
67
-
68
-
69
-
70
-
71
-
72
-
73
-
74
-
75
-
76
-
77
-
78
-
79
-
80
-
81
 |
 |
