ViewSonic P810 User Guide - Page 8
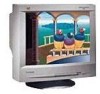
ViewSonic P810 - 21" CRT Display Manual
 |
View all ViewSonic P810 manuals
Add to My Manuals
Save this manual to your list of manuals |
Page 8 highlights
Operation Adjust your ViewSonic P810 monitor using the buttons on the front control panel as shown below. Front Control Panel To adjust the monitor, follow the numbered steps in sequence as shown below. E N G L I S H – Press button [1] for the main menu shown below — Press the [M] or [L] arrow to select an option to adjust ˜ Press button [2] for an individual control screen Power on/off* 1 Press button [1] to save changes and exit the screen 2 Press the [M] or [L] arrow make adjustments š ™ Power light: Green = on Orange = power saving mode OnView® Main Menu The menu below shows the various controls for adjusting the monitor. Contrast/Brightness Size&Position Geometry Tilt ViewMatch Color ViewMeter / De g auss Memor y Recall Video Level Moire Reduction OSD Lan g ua g e/Position 1 :Exit Select : 2 OSD * The monitor automatically degausses when you turn on the monitor. Degaussing removes magnetic field buildup that can affect color purity and convergence. However, turning the monitor on and off repeatedly may cause damage. Wait 20 minutes before turning the unit off and on again. To manually degauss the monitor from the menu, see page 10. ViewSonic P810 Operation 7
-
 1
1 -
2
-
 3
3 -
 4
4 -
 5
5 -
 6
6 -
 7
7 -
 8
8 -
 9
9 -
 10
10 -
 11
11 -
 12
12 -
 13
13 -
14
-
15
-
16
-
17
-
18
 |
 |
