ViewSonic PJ406D User Guide - Page 19
Control Panel & Remote Control
 |
UPC - 766907162714
View all ViewSonic PJ406D manuals
Add to My Manuals
Save this manual to your list of manuals |
Page 19 highlights
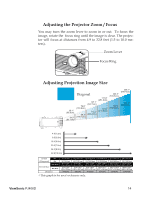
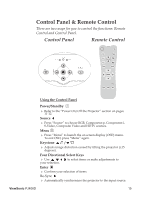
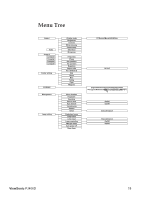
Control Panel & Remote Control There are two ways for you to control the functions: Remote Control and Control Panel. Control Panel Remote Control MENU POWER TEMP LAMP POWER/ STANDBY SOURC E - R E SYNC Using the Control Panel Power/Standby Refer to 11-12. the "Power On/Off the Projector" section on pages Source Press "Source" to choose RGB, S-Video, Composite Video and Component-p, Component-i, HDTV sources. Menu Press "Menu" to launch the To exit OSD, press "Menu" on screen again. display (OSD) menu. Keystone / Adjusts image degrees). distortion caused by tilting the projector (±15 Four Directional Select Keys youUr sseelection. to select items or make adjustments to Enter Confirm your selection of items. Re-Sync Automatically synchronizes the projector to the input source. ViewSonic PJ406D 15
-
 1
1 -
2
-
3
-
4
-
5
-
6
-
7
-
8
-
9
-
10
-
11
-
12
-
13
-
 14
14 -
 15
15 -
 16
16 -
 17
17 -
 18
18 -
 19
19 -
 20
20 -
 21
21 -
 22
22 -
 23
23 -
 24
24 -
25
-
26
-
27
-
28
-
29
-
30
-
31
-
32
-
33
-
34
-
35
-
36
-
37
-
38
 |
 |
