ViewSonic VOT133 VOT133 User Guide (English)
ViewSonic VOT133 Manual
 |
View all ViewSonic VOT133 manuals
Add to My Manuals
Save this manual to your list of manuals |
ViewSonic VOT133 manual content summary:
- ViewSonic VOT133 | VOT133 User Guide (English) - Page 1
VOT133 PC Mini User Guide Model No. VS14165 - ViewSonic VOT133 | VOT133 User Guide (English) - Page 2
. This equipment generates, uses, and can radiate radio frequency energy, and if not installed and used in accordance with the instructions, may cause harmful interference to radio communications. However, there is no guarantee that interference will not occur in a particular installation - ViewSonic VOT133 | VOT133 User Guide (English) - Page 3
with Canadian RSS-210.To prevent radio interference to the licensed service, this device is intended to be operated indoors and away from equipment meets the following conformance standards: ETSI EN 300 328 EN 301 489-01 EN 301 489-17 Notified Countries: Germany, UK, Netherlands, Belgium, Sweden, - ViewSonic VOT133 | VOT133 User Guide (English) - Page 4
in accordance with the manufacturer's instructions. 7. Do not install near any emerges from the equipment. Be sure that the power outlet is located near the equipment so that periods of time. 13. Refer all servicing to qualified service personnel. Service is required when the unit has been - ViewSonic VOT133 | VOT133 User Guide (English) - Page 5
Hexavalent Chromium (Cr6+) Polybrominated biphenyls (PBB) Polybrominated diphenyl ethers (PBDE) Proposed Maximum Concentration 0,1% 0,1% 0,01% 0,1% 0,1% 0,1% Actual Concentration < 0,1% < 0,1% < 0,01% < 0,1% < 0,1% < 0,1% Certain components of products as stated above are exempted under the Annex - ViewSonic VOT133 | VOT133 User Guide (English) - Page 6
fax to ViewSonic®. For Your Records Product Name: Model Number: Document Number: Serial Number: Purchase Date: VOT133 ViewSonic PC Mini VS14165 ViewSonic website to learn more. USA & Canada: http://www.viewsonic.com/company/green/recycle-program/ Europe: http://www.viewsoniceurope.com/uk/support - ViewSonic VOT133 | VOT133 User Guide (English) - Page 7
7 Connect the Monitor 7. Connect the USB Devices 7. Connect the Network Cable 8 Connect the Power Cord 8 Chapter 3 Install Windows 7 in PC Mini Install Windows 7 10 Install Drivers in Windows 7 14 Chapter 4 Specifications Specifications 15 Chapter 5 Other Information Customer Support 16 - ViewSonic VOT133 | VOT133 User Guide (English) - Page 8
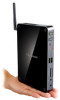
Chapter 1 Introducing the PC Mini The PC Mini is a compact and easy to use desktop. It features all the desktop capabilities but with a slim body design which enables your to browse the internet in a relax and comfortable way. This chapter introduces PC Mini's outlook Top View ■ Front Side View ■ - ViewSonic VOT133 | VOT133 User Guide (English) - Page 9
PC Mini optical connectors(3.5mm jack) 3 Multi-Function Card Reader Support SD/SDHC/MS/MS Pro/MMC memory cards 4 driver" in the Driver CD. 5 HDD_LED Indicates hard disk states 6 Suspend Button Enter suspend mode in operating system 7 Power Button with Integrated LED Indicator Turning the power - ViewSonic VOT133 | VOT133 User Guide (English) - Page 10
power adapter 1-4 Bottom View 1 CAUTION No. Name 1 Sheet Metal Description Magnetic metal feet can be used for connection to optional VDD100 CD/DVD RW drive ! There are four Magnet-Metal-Feet in the package. Just align them to the sheet metal on the bottom, then they can magnetize the PC Mini - ViewSonic VOT133 | VOT133 User Guide (English) - Page 11
Chapter 2 Placing and connecting the PC Mini In this chapter, the placement and the connection of some necessary peripherals will be introduced. This chapter includes the following information: ■ Placement of PC Mini ■ Connection of PC Mini 4 - ViewSonic VOT133 | VOT133 User Guide (English) - Page 12
image. 2. If there is enough space on your desk, you can simply put y ou r PC Mini on the tabletop as shown below. 2-2 Connection of PC Mini 1. Connect the Antenna Connect the antenna to the RF port of the PC Mini. You can fold the antenna and rotate it in different angle as you want. 1 2 5 - ViewSonic VOT133 | VOT133 User Guide (English) - Page 13
2. Connect the Monitor Connect a VGA to the PC Mini through DVI/VGA adapter. 3. Connect the USB Devices Connect USB devices to the USB ports of the PC Mini, for example, mouse and keyboard. 4. Connect the Network Cable Connect LAN cable to the RJ-45 port, with the other end connected to a hub or - ViewSonic VOT133 | VOT133 User Guide (English) - Page 14
CAUTION 5. Connect the Power Cord Connect the power adapter to the power input port of the PC Mini, and push the power button to start it. 1 Outlet 3 2 ! The power adapter is dissipating heat during normal use, please make sure not to cover it and keep it away from your body to prevent discomfort - ViewSonic VOT133 | VOT133 User Guide (English) - Page 15
Chapter 3 Install Windows 7 in PC Mini This chapter introduces the Windows installation : This chapter includes the following information Install Windows 7 ■ Install Drivers in Windows 7 Note: Skip this section, if you have purchased a PC Mini model with Windows 7 pre-installed. 8 - ViewSonic VOT133 | VOT133 User Guide (English) - Page 16
-ROM drive.) 2. PC Mini driver CD. (In this package) 3. Windows 7 Install CD. (Other purchase) Before we continue : ■ Your PC Mini power is off. ■ USB port of PC Mini and power it on. 3-1 Install Windows 7 1. Push power on button to turn on your computer, then press key to enter BIOS Setup. 2. - ViewSonic VOT133 | VOT133 User Guide (English) - Page 17
4. The computer will reboot, and it will start loading the files for installing the Windows 7 Operating System. 5. After the computer reboots it will start loading the files for installing Windows 7. Click "Next" to continue and click "Install now" button to start the setup. 6. When the license - ViewSonic VOT133 | VOT133 User Guide (English) - Page 18
9. In the hard disk size screen, you can click the "new" button to create partitions as you need. In this example we are creating a 70GB partition to install Windows. Make your modifications and click "Apply". To ensure that all Windows features work correctly, Windows might create additional - ViewSonic VOT133 | VOT133 User Guide (English) - Page 19
10. The setup program will then start to install Windows 7 on your hard disk. During the installation, your computer will restart several times. 11. When the installation is complete, setup will prepare your computer for it's first use. You can then follow the steps to select system settings, create - ViewSonic VOT133 | VOT133 User Guide (English) - Page 20
must click "AMD Chipset Driver" to install it first. After that, you can click "One Click Setup" and then choose the items you want to install, or you can click on each individual driver to install it manually. 4. After all the drivers are installed, you need to restart your PC Mini, then you can - ViewSonic VOT133 | VOT133 User Guide (English) - Page 21
Bluetooth • 2.1+EDR (Optional) LED indicator • Power on/off • HDD LED Dimension • 190(W) x 135(D) x 24(H)mm Weight • 450g Accessories • PC Mini VOT133, Power Cord, Power adaptor, Desk Stand, VESA Mount, Quick Start Guide, ViewSonic Wizard CD, DVI to D-Sub adapter, WiFi Antenna, Magnet rubber - ViewSonic VOT133 | VOT133 User Guide (English) - Page 22
F= 1-909-468-3757 Europe www.viewsoniceurope.com www.viewsoniceurope.com/uk/Support/Calldesk.htm Hong Kong www.hk.viewsonic.com T= 852 3102 2900 [email protected] India www.in.viewsonic.com T= 1800 266 0101 [email protected] Ireland (Eire) www.viewsoniceurope.com/uk/ www - ViewSonic VOT133 | VOT133 User Guide (English) - Page 23
or ship the product freight prepaid in the original container to an authorized ViewSonic service center or ViewSonic. 4. For additional information or the name of the nearest ViewSonic service center, contact ViewSonic. 4.3: ViewSonic PC Mini Warranty Page 1 of 2 PC Mini_LW01 Rev. 1a 07-02-09 17 - ViewSonic VOT133 | VOT133 User Guide (English) - Page 24
For warranty information and service on ViewSonic products sold outside of the U.S.A. and Canada, contact ViewSonic or your local ViewSonic dealer. The warranty period .com under Support/Warranty Information. 4.3: ViewSonic PC Mini Warranty Page 2 of 2 PC Mini_LW01 Rev. 1a 07-02-09 18 - ViewSonic VOT133 | VOT133 User Guide (English) - Page 25
-
 1
1 -
 2
2 -
 3
3 -
 4
4 -
 5
5 -
 6
6 -
 7
7 -
8
-
9
-
10
-
11
-
12
-
13
-
14
-
15
-
16
-
17
-
18
-
19
-
20
-
21
-
22
-
23
-
24
-
25
 |
 |

VOT133
PC Mini
User Guide
Model No. VS14165