ViewSonic VPC101 User Manual - Page 41
Standard CMOS Features menu, Advanced BIOS Features menu - won t boot
 |
View all ViewSonic VPC101 manuals
Add to My Manuals
Save this manual to your list of manuals |
Page 41 highlights
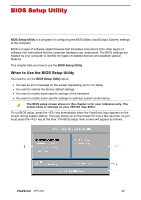
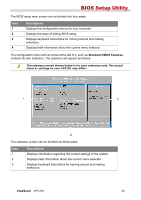
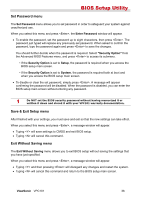
BIOS Setup Utility The BIOS Setup Utility provides a General Help screen. You can access this screen for assistance by pressing . From the displayed screen, you may learn the appropriate keys to use and the possible selections for the highlighted item. Pressing will exit this screen. Standard CMOS Features menu The Standard CMOS Features menu contains the basic configuration settings of the system and shows some system information, such as the BIOS version, CPU type and speed, and the system memory, etc. A brief description of the adjustable menus displays in the Descriptions box below. Menu Date (mm:dd:yy) Time (hh:mm:ss) IDE Channel 0 Master IDE Channel 1 Master Descriptions Allows you to set the date of the system. Use or to select an item, and then press or to change the value. Allows you to set the time of the system. Use or to select an item, and then press or to change the value. Displays the currently installed hard drive. Press to access its submenu for more information. It is recommended that you set Auto for the available options. Displays the currently installed optical drive. Press to access its submenu for more information. It is recommended that you set Auto for the available options. Advanced BIOS Features menu The Advanced BIOS Features menu displays all the bootable devices present on the system. It offers options for setting boot device priority, boot setting configurations, security, and video memory size. A brief description of the adjustable menus displays in the Descriptions box below. Menu Hard Disk Boot Priority CD-ROM Boot Priority Network Boot Priority Descriptions Press to access its submenu. Use or to specify a device and then use or to change the sequence. Press to save the changes and exit the menu. ViewSonic VPC101 34
-
 1
1 -
2
-
3
-
4
-
5
-
6
-
7
-
8
-
9
-
10
-
11
-
12
-
13
-
14
-
15
-
16
-
17
-
18
-
19
-
20
-
21
-
22
-
23
-
24
-
25
-
26
-
27
-
28
-
29
-
30
-
31
-
32
-
33
-
34
-
35
-
 36
36 -
 37
37 -
 38
38 -
 39
39 -
 40
40 -
 41
41 -
 42
42 -
 43
43 -
 44
44 -
 45
45 -
 46
46 -
47
-
48
-
49
-
50
-
51
-
52
-
53
-
54
-
55
-
56
-
57
-
58
-
59
-
60
-
61
-
62
-
63
-
64
 |
 |
