Viking 24" Fully Integrated All Freezer with 5/7 Series Panel Multi-Unit Refri
Viking 24" Fully Integrated All Freezer with 5/7 Series Panel Manual
 |
View all Viking 24" Fully Integrated All Freezer with 5/7 Series Panel manuals
Add to My Manuals
Save this manual to your list of manuals |
Viking 24" Fully Integrated All Freezer with 5/7 Series Panel manual content summary:
- Viking 24" Fully Integrated All Freezer with 5/7 Series Panel | Multi-Unit Refri - Page 1
Installation GUIDE 7 SERIES Multi-Unit Refrigeration Connector Kit CKVBI - Viking 24" Fully Integrated All Freezer with 5/7 Series Panel | Multi-Unit Refri - Page 2
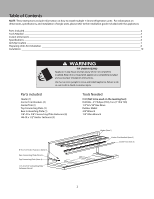
Table of Contents NOTE: These instructions include information on how to install multiple 7 Series refrigeration units. For information on dimensions, specifications, and installation of single units, please refer to the installation guide included with the appliances. Parts Included 2 Tools Needed - Viking 24" Fully Integrated All Freezer with 5/7 Series Panel | Multi-Unit Refri - Page 3
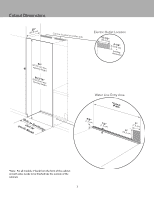
Cutout Dimensions (632.55"cm) Can be located on either side * (o2p1e3n.4i8ncg4m"h)emigihnt. (o2p18e65n.3i-n3cgm/1h) e6mi"gahxt. Electric Outlet Location (1359-.41/c2m") (140-1.+8/4cm" ) dliemveenlinsigon Water Line Entry Area *WCuidtothut spec*ifRicecfhMearorttdoefolSsrpecification (15.6/ - Viking 24" Fully Integrated All Freezer with 5/7 Series Panel | Multi-Unit Refri - Page 4
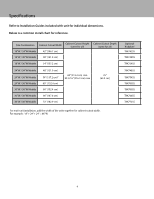
Specifications Refer to Installation Guides included with unit for individual dimensions. Below is a common install chart for reference. Size Combination Cabinet Cutout Width 18"W / 24"W Models 42" (106.7 cm) Cabinet - Viking 24" Fully Integrated All Freezer with 5/7 Series Panel | Multi-Unit Refri - Page 5
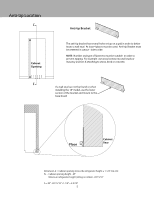
Anti-tip Location C Cabinet Opening Anti-tip Bracket The anti-tip bracket has several holes set up on a grid in order to better locate a wall stud. At least 4 places must be used. Anti-tip Bracket must be centered in cutout - side to side. NOTE: Number and type of fasteners must be suitable in - Viking 24" Fully Integrated All Freezer with 5/7 Series Panel | Multi-Unit Refri - Page 6
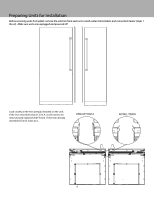
Preparing Units for Installation Before removing units from pallet, remove the side trim from each unit, install center trim brackets and connection heater (steps 1 thru 4). Make sure units are unplugged and powered off. A A Look closely at the trim already installed on the unit. If the trim - Viking 24" Fully Integrated All Freezer with 5/7 Series Panel | Multi-Unit Refri - Page 7
Preparing Units for Installation 3. Fasten heater (Item #1) to the three mounting holes on top of the right hand unit using the #8-18 x 1/2" fasteners (Item #7) provided. 4. Plug heater terminal into right hand unit using the plug located next to the unit on/off switch. 7 - Viking 24" Fully Integrated All Freezer with 5/7 Series Panel | Multi-Unit Refri - Page 8
doors closed until appliance is completely installed and secured per installation instructions. Use two or more people to move and install appliance. x 3/4" (Item #6) fasteners. DO NOT install using a drill. Use manual allen wrench. (See Illustration B). Loosely attach the bracket allowing it to - Viking 24" Fully Integrated All Freezer with 5/7 Series Panel | Multi-Unit Refri - Page 9
the hand ratchet**. Attach units to cabinet side trim and fasteners included with the units. Install stainless magnetic side trim once fastened. (Use installation guide included with individual units as a reference.) .125" WHEN INSTALLED Lift Pattern Diagram 2 REAR 6 4 REAR 8 7 FRONT 3 5 FRONT 1 9 - Viking 24" Fully Integrated All Freezer with 5/7 Series Panel | Multi-Unit Refri - Page 10
Installation 10. Remove plastic film from center trim before installing. Install center connecting trim (Item #3) in between the two units by pressing it in. Trim should be even with the top of the units. If needed, tap connecting trim gently into place with rubber mallet. NOTE: Open both doors to - Viking 24" Fully Integrated All Freezer with 5/7 Series Panel | Multi-Unit Refri - Page 11
Optional Custom Kickplate Installation Remove screws fastening individual kickplates on units. Save screws to be used when installing custom kickplate. Place custom kickplate across bottom of both units and fasten using the mounting holes for the individual kickplates. 11 - Viking 24" Fully Integrated All Freezer with 5/7 Series Panel | Multi-Unit Refri - Page 12
067841-000A EN Viking Range, LLC 111 Front Street Greenwood, Mississippi 38930 (662) 455-1200 For product information, call 1-888-845-4641 or visit our web site at vikingrange.com (101519) - Viking 24" Fully Integrated All Freezer with 5/7 Series Panel | Multi-Unit Refri - Page 13
Guide d'installation SÉRIE 7 Kit d'assemblage de plusieurs appareils de réfrigération CKVBI - Viking 24" Fully Integrated All Freezer with 5/7 Series Panel | Multi-Unit Refri - Page 14
instructions contiennent des renseignements sur l'assemblage de plusieurs appareils de réfrigération série 7. Pour plus de renseignements sur les dimensions, les spécificités et l'installation individuelles des appareils, veuillez vous référer aux guides Chauffage (1) Supports de tige centrale - Viking 24" Fully Integrated All Freezer with 5/7 Series Panel | Multi-Unit Refri - Page 15
Dimensions de découpe (6235,5pcom) Peut être situé de l'autre côté Emplacement de la prise électrique 1(53-91,4/2cmp)o dmi4mi(s1-ee10n,à/+8s4niocipvmneo)daeu * hau(t2e1u3r8,d44ecmlp'oo)umveinrt.ure hau(t28e1u56r-,3d3ec/m1l'6o) umpvaeoxrt.ure les mcoa*drSèaecletrséérsfiépstré - Viking 24" Fully Integrated All Freezer with 5/7 Series Panel | Multi-Unit Refri - Page 16
Spécificités Pour obtenir les dimensions individuelles des appareils, veuillez vous référer aux guides d'installation fournis avec ceux-ci. Le tableau ci-dessous répertorie les combinaisons les plus fréquentes. Option de combinaison (largeur des modèles) 18 po / - Viking 24" Fully Integrated All Freezer with 5/7 Series Panel | Multi-Unit Refri - Page 17
des clous ou des ancrages de maçonnerie si l'installation se fait sur de la pierre, de la brique ou du béton. Le support anti-basculement doit être centré horizontalement dans l'encadrement. Sol A Arrière de l'encadrement Dimension A = Ouverture de l'encadrement moins la hauteur du réfrigérateur - Viking 24" Fully Integrated All Freezer with 5/7 Series Panel | Multi-Unit Refri - Page 18
unités pour l'installation Avant de retirez les appareils de leur socle, retirez les tiges latérales de chaque appareil et installez les supports de tige centrale ainsi que le chauffage de liaison (étapes 1 à 4). Assurez-vous que les appareils sont bien éteints et débranchés. A A 1. Retirez les - Viking 24" Fully Integrated All Freezer with 5/7 Series Panel | Multi-Unit Refri - Page 19
Préparation des unités pour l'installation 3. Fixez le chauffage (élément nº 1) aux trois trous en haut de l'appareil de droite à l'aide des attaches 8-18 x 1/2 po (élément nº 7) fournies. 4. Branchez le chauffage à l'appareil de droite en utilisant la prise située à côté de l'interrupteur marche/ - Viking 24" Fully Integrated All Freezer with 5/7 Series Panel | Multi-Unit Refri - Page 20
la sécurisation complète de l'appareil conformément aux instructions d'installation. Il faut deux personnes ou plus pour installer manuelle. (Voir illustration B) Fixez lâchement le support en le faisant pivoter. Si vous serrez les vis, le support se pliera et provoquera un désalignement de l' - Viking 24" Fully Integrated All Freezer with 5/7 Series Panel | Multi-Unit Refri - Page 21
la hauteur désirée à l'aide des pieds de nivellement et enclenchez le support anti-basculement. N'UTILISEZ PAS DE PERCEUSE- (reportez-vous au schéma de la tige latérale magnétique inoxydable. (Référez-vous au guide d'installation pour appareils individuels) .125" UWnHeENfoINisSTinALsLtEaDllé Schéma - Viking 24" Fully Integrated All Freezer with 5/7 Series Panel | Multi-Unit Refri - Page 22
Installation 10.. Insérez la tige de liaison centrale (élément nº 3) entre les deux appareils en faisant pression. La tige doit être alignée avec le haut des appareils. En cas de besoin, enfoncez délicatement la tige à l'aide d'un maillet en caoutchouc. REMARQUE : ouvrez les deux portes pour - Viking 24" Fully Integrated All Freezer with 5/7 Series Panel | Multi-Unit Refri - Page 23
Installation facultative de la plaque de protection sur mesure Retirez les vis fixant les plaques de protection individuelles des appareils. Conservez les vis pour fixer la plaque de protection sur mesure. Placez la plaque de protection en bas à l'arrière des appareils et fixez-la aux trous libérés - Viking 24" Fully Integrated All Freezer with 5/7 Series Panel | Multi-Unit Refri - Page 24
Viking Range, LLC 111 Front Street Greenwood, Mississippi 38930 É.-U. (662) 455-1200 Pour obtenir des renseignements sur le produit, appelez au 1-888-845-4641 ou visitez notre site Web au vikingrange.com 067841-000A FR (101519)
-
 1
1 -
 2
2 -
 3
3 -
 4
4 -
 5
5 -
 6
6 -
 7
7 -
8
-
9
-
10
-
11
-
12
-
13
-
14
-
15
-
16
-
17
-
18
-
19
-
20
-
21
-
22
-
23
-
24
 |
 |

Installation
GUIDE
7 SERIES
Multi-Unit Refrigeration Connector Kit
CKVBI