Viking 24" Fully Integrated All Freezer with 5/7 Series Panel Multi-Unit Refri - Page 2
Table of Contents, WARNING
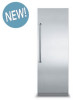 |
View all Viking 24" Fully Integrated All Freezer with 5/7 Series Panel manuals
Add to My Manuals
Save this manual to your list of manuals |
Page 2 highlights
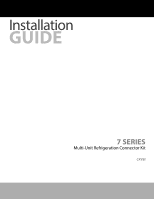
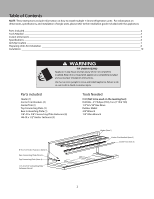
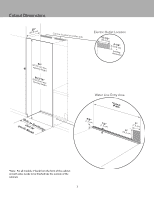
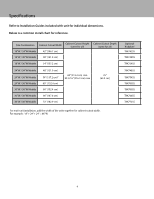
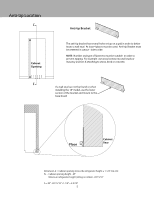
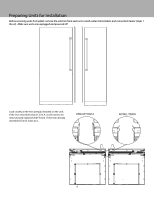
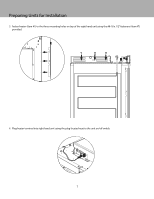
Table of Contents NOTE: These instructions include information on how to install multiple 7 Series refrigeration units. For information on dimensions, specifications, and installation of single units, please refer to the installation guide included with the appliances. Parts Included 2 Tools Needed 2 Cutout dimensions 3 Specifications 4 Anti-tip location 7 Preparing Units for Installation 8 Installation 10 WARNING TIP OVER HAZARD Appliance is top heavy and tips easily when not completely installed. Keep doors closed until appliance is completely installed and secured per installation instructions. Use two or more people to move and install appliance. Failure to do so can result in death or serious injury. Parts included Heater (1) Center Trim Brackets (2) Center Trim (1) Top Connecting Plate (1) Rear Connecting Plate (1) 1/4"-20 x 3/4" Connecting Plate Fasteners (6) #8-18 x 1/2" Heater Fasteners (3) Tools Needed Drill (Not to be used on the leveling feet) Drill Bits - 3" Phillips (PH2), Torx (T15 & T20) 1/4" & 5/16" Hex Drive Rubber Mallet 3/8" Wrench 1/8" Allen Wrench 8-18 x 1/2" Heater Fasteners (Item 7) Rear Connecting Plate (Item 5) Top Connecting Plate (Item 4) 1/4"-20 x 3/4" Connecting Plate Fasteners (Item 6) Heater (Item 1) Center Trim Brackets (Item 2) Center Trim (Item 3) 2
-
 1
1 -
 2
2 -
 3
3 -
 4
4 -
 5
5 -
 6
6 -
 7
7 -
 8
8 -
9
-
10
-
11
-
12
-
13
-
14
-
15
-
16
-
17
-
18
-
19
-
20
-
21
-
22
-
23
-
24
 |
 |
