Viking BVGRC8366BWSS Installation Instructions - Page 8
Installation
 |
View all Viking BVGRC8366BWSS manuals
Add to My Manuals
Save this manual to your list of manuals |
Page 8 highlights
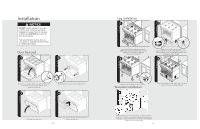
Installation NOTICE DO NOT use the handle or oven door to lift the oven. Remove door before installation to ensure that it is not used to lift the unit. DO NOT lift or carry the door by the handle. Removing the door must be done by your dealer, a qualified licensed plumber, or certified gas installer. Door Removal 1 2 Open door completely. Place pins, supplied with unit, in pin hole. For personal safety, ONLY use pins supplied with the unit. 3 2 2 1 Remove hinge trim screws. Take off hinge trim. 4 Close until pins stop door. 14 Lift door up and out. Leg Installation 1 2 Legs are packed in cardboard top pack. Note: Legs should be installed near to where appliance is to be used, as they are not secure for long transit. 3 1 2 1 3 Note: It is strongly recommended that a pallet or lift jack be used rather than tilting. Raise unit about a foot. Unscrew temporary legs from couplings on all four corners. 4 Screw legs into couplings on all four corners. Kickplate Installation Lower range gently to keep any undue strain from legs and internal mounting hardware. The kickplate bracket and scews (2) are located with the antitip bracket. Without removing the kickplate and using a short screw driver, install the bracket on the inside of the kickplate using the two screws provided. 15
-
 1
1 -
2
-
 3
3 -
 4
4 -
 5
5 -
 6
6 -
 7
7 -
 8
8 -
 9
9 -
 10
10 -
 11
11 -
 12
12
 |
 |
