Viking RVMHC330 Installation Instructions - Page 8
Viking RVMHC330 Manual
 |
View all Viking RVMHC330 manuals
Add to My Manuals
Save this manual to your list of manuals |
Page 8 highlights
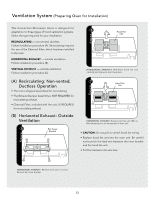
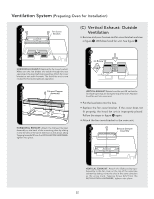
Oven Installation (A) (A) figure ffiigguurree figurefigure ffiigguurree figure figure (B) (B) (B) MOUNTING OVEN TO THE WALL: Using cutting line around the carton, cut into two pieces (A) and (B). ffiigguurree figure (B) MOUNTING OVEN TO THE WALL: Place the oven and the carton portions together on the top of the range. Slide carton toward backguard until it stops. Align the lower back edge of the oven with the mounting plate. Thread the power supply cord through the hole made in the bottom of the top cabinet. figure ffiigguurree figurefigure (B) MOUNTING OVEN TO THE WALL: Hang the lower edge of the mounting plate. Take ctha(eBre)otvheant tohen power cord is able to clear the edge of the hole as the oven is rotated upward. (In the case of a non-recessed bottom in the top cabinet, the hole for the cord may need to be enlarged.) Remove the carton portions. figure (C) (C (D) Mounting Screws MOUNTING OVEN TO THE WALL: Tighten the two unit Mounting Screws located in the grease filter openings. (C) (D) E7
-
 1
1 -
2
-
 3
3 -
 4
4 -
 5
5 -
 6
6 -
 7
7 -
 8
8 -
 9
9 -
 10
10 -
 11
11 -
 12
12 -
 13
13 -
14
-
15
-
16
-
17
-
18
-
19
-
20
-
21
-
22
-
23
-
24
-
25
-
26
-
27
-
28
 |
 |
