Viking VBI7360W Installation Instructions - Page 12
Door / Drawer Panel Adjustments
 |
View all Viking VBI7360W manuals
Add to My Manuals
Save this manual to your list of manuals |
Page 12 highlights
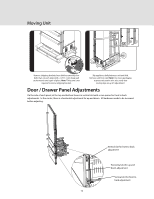
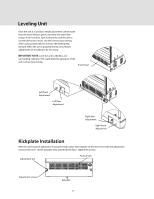
Moving Unit 1 A Remove shipping brackets from skid by removing four bolts (two on each side) with a 1/2" (1.3 cm) deep-well socket wench and a pair of pliers. Note: Tilting unit is not required to remove shipping brackets. Slip appliance dolly between unit and skid. Remove unit from skid. Note: Use excess packaging to protect decorative trim; also, verify that leveling legs are up (0" adjustment). Door / Drawer Panel Adjustments On the side of each panel, at the top and bottom there is a vertical slot with a cam spacer for front to back adjustments. In the center, there is a horizontal adjustment for up and down. All hardware needs to be loosened before adjusting. Vertical slot for front to back F adjustment Horizontal slot for up and down adjustment Vertical slot for front to back adjustment 12
-
 1
1 -
2
-
3
-
4
-
5
-
6
-
 7
7 -
 8
8 -
 9
9 -
 10
10 -
 11
11 -
 12
12 -
 13
13 -
 14
14 -
 15
15 -
 16
16 -
 17
17 -
18
-
19
-
20
-
21
-
22
-
23
-
24
 |
 |
