Viking VCBB5363ER Installation Instructions - Page 19
cont.
 |
View all Viking VCBB5363ER manuals
Add to My Manuals
Save this manual to your list of manuals |
Page 19 highlights
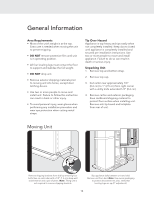
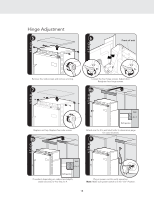
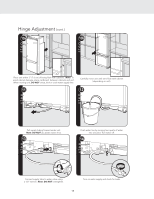
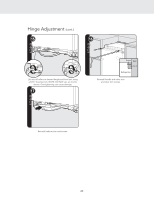
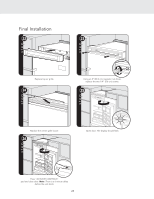
Hinge Adjustment (cont.) 10a 10b 3" Place unit within 3" (7.6 cm) of being flush with cabinets. Note: To avoid cabinet damage, place cardboard between cabinets and unit. When moving unit, DO NOT crimp, kink or crush water supply line. Carefully move unit until semi flush with cabinet (depending on unit). 11 12 Pull supply tubing forward under unit. Note: DO NOT use plastic water lines. 13 Flush water line by running two quarts of water into a bucket. Turn water off. 14 Connect supply tube to water valve using a 1/2" wrench. Note: DO NOT overtighten. 19 Turn on water supply and check for leaks.
-
 1
1 -
2
-
3
-
4
-
5
-
6
-
7
-
8
-
9
-
10
-
11
-
12
-
13
-
 14
14 -
 15
15 -
 16
16 -
 17
17 -
 18
18 -
 19
19 -
 20
20 -
 21
21 -
 22
22 -
 23
23 -
 24
24 -
25
-
26
-
27
-
28
 |
 |

19
11
12
13
14
Pull supply tubing forward under unit.
Note: DO NOT
use plastic water lines.
Flush water line by running two quarts of water
into a bucket. Turn water off.
Connect supply tube to water valve using
a 1/2” wrench.
Note: DO NOT
overtighten.
Turn on water supply and check for leaks.
10b
Place unit within 3” (7.6 cm) of being flush with cabinets.
Note:
To
avoid cabinet damage, place cardboard
between cabinets and unit.
When moving unit,
DO NOT
crimp, kink or crush water supply line.
Carefully move unit until semi flush with cabinet
(depending on unit).
3”
3”
3”
10a
Hinge Adjustment
(cont.)