Viking VCPS303SS Use and Care Manual - Page 5
Features, Firing & Feeding
 |
View all Viking VCPS303SS manuals
Add to My Manuals
Save this manual to your list of manuals |
Page 5 highlights
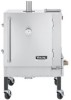
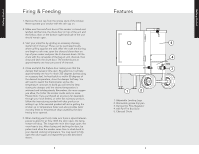
Getting Started Firing & Feeding 1. Remove the rain cap from the smoke stack of the smoker. Never operate your smoker with the rain cap on. 2. Make sure the main/front door of the smoker is closed and latched. At this time, the chute door on top of the unit and the firebox door on the bottom right hand side of the unit should remain open. 3. Start your initial fire by igniting an accessory chimney starter full of charcoal. These can be purchased locally where grilling supplies are sold. After the coals are burning and begin to ash over, open the charcoal chute door on top of your cooker and pour the lit charcoal down. Fill the chute with the remainder of the bag of unlit charcoal, then close and latch the chute door. The smoker burns at approximately one hour per pound of charcoal. 4. Close and latch the firebox door making sure that the damper (ball valve) is fully open. Be patient as it will take approximately one hour to reach 225 degrees (unless using an accessory fan). As heat builds to within 50 degrees of the desired temperature, close the damper half way. You will need to watch the thermometer and as the temperature continues to build you will need to keep closing the damper until the desired temperature is achieved and holding steady. Remember, the more oxygen you allow, the hotter the smoker cooks and vice versa. Please Note: If you purchased an accessory fan (available through your local dealer), or other fan accessory product, follow the instructions provided with that product on setting it up. A fan assisted product will aid in getting the smoker up to temperature faster and also provides faster recovery times to temperature drop caused by the door having to be opened. 5. When loading your food, make sure there is space between pieces to allow for air flow. With the door open, the temperature will drop. The longer the main door stays open, the more heat is lost. After closing and latching the door, be patient and allow the smoker some time to climb back to your desired cooking temperature. You may need to fully open the valve again and repeat the process described above. 8 Features 5 4 3 1 2 1. Adjustable Leveling Legs 2. Removable grease drip pan 3. Damper/Air Flow Regulator 4. Ash Pan/Fire Box Door 5. Charcoal Chute 9 Getting Started
-
 1
1 -
 2
2 -
 3
3 -
 4
4 -
 5
5 -
 6
6 -
 7
7 -
 8
8 -
 9
9 -
 10
10
 |
 |
