Viking VDOT Installation Instructions
Viking VDOT Manual
 |
View all Viking VDOT manuals
Add to My Manuals
Save this manual to your list of manuals |
Viking VDOT manual content summary:
- Viking VDOT | Installation Instructions - Page 1
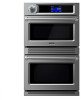
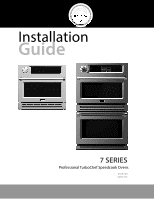
Installation Guide 7 SERIES Professional TurboChef Speedcook Ovens VSOT730 VDOT730 - Viking VDOT | Installation Instructions - Page 2
Table of Contents Warnings and Important Information 3 Dimensions 6 Specifications 8 Cutout Dimensions 9 General Information 11 Installation 12 Performance Checklist 16 Control Panel 16 Service & Registration 17 2 - Viking VDOT | Installation Instructions - Page 3
ANSI/NFPA 70-latest edition. • The installer must leave these instructions with the consumer who should retain for local inspector's use and others is very important. We have provided many important safety messages in this manual and on your appliance. ALWAYS read and obey all safety messages. This - Viking VDOT | Installation Instructions - Page 4
is normally related to the location of a receptacle with respect to any significant sources of water or moisture. • Viking Range, LLC will NOT warranty any problems resulting from GFI outlets which are not installed properly or do not meet the requirements below. If the use of a GFI is required, it - Viking VDOT | Installation Instructions - Page 5
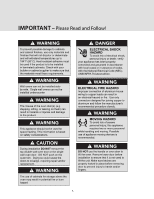
IMPORTANT - Please Read and Follow! WARNING To prevent possible damage to cabinets and cabinet finishes, use only materials and finishes that will not discolor or delaminate and will withstand temperatures up to 194°F (90°C). Heat resistant adhesive must be used if the product is to be installed in - Viking VDOT | Installation Instructions - Page 6
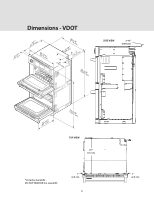
Dimensions - VDOT (73.-91/c8m") (612.40"c*m) (3706-.15/1c6m") (7218.-41/c8m") (93.-87/c8m") (10.42"cm) UOPFPFER (10.42"cm) LOOFWF ER (15208-.30/c8m" ) SIDE VIEW 7/16" (0.44 cm) (5220.-11/c2m") (15209-.72/c8m" ) TOP VIEW 24"* (61.0 cm) *Includes standoffs DO NOT REMOVE the standoffs 1" - Viking VDOT | Installation Instructions - Page 7
Dimensions - VSOT 3-1/8" (7.9 cm) 24" (61.0 cm) (7360.5-1c/m16) " (772.84-c1m/5)" 3-7/8" (9.8 cm(1) 04."2 cm) 4" (10.2 cm) 28-3/8" (72.1 cm) TOP VIEW 2(05-21./12c"m) 28-7/8" (73.3 cm) SIDE VIEW 7/16" (0.44 cm) 24"* (61.0 cm) 1" (2.5 cm) *Includes standoffs DO NOT REMOVE the standoffs 1" - Viking VDOT | Installation Instructions - Page 8
HSpeeacdifliicnaetions Description Product width outside cabinet Product height outside cabinet Product depth outside cabinet Cutout height Cutout depth Cutout width Electrical requirements Maximum amp usage Oven Interior Width Oven Interior Height Oven Interior Depth Oven Volume (total oven cavity - Viking VDOT | Installation Instructions - Page 9
HCuetaodultinDeimensions - VDOT WARNING Wall ovens can not be installed side-by-side. 1(2".5Mcmin). (15208-.56/c8m" ) (2782-.61/c2m") 1(218".2Mcmin). aMreapkeerspuernedwicaulllasr LJuonBcacottxiioonn (612.04"cm) (10.42"cm) (51"2.7Mcimn.) To obtain proper fit of the oven into the cabinets, the - Viking VDOT | Installation Instructions - Page 10
Cutout Dimensions - VSOT WARNING Wall ovens can not be installed side-by-side. Single wall ovens can not be installed undercounter 1(2".5Mcmin). 28(-752/.87"cmM)in. 1(218".2Mcmin). (2782-.61/c2m") aMreapkeerspuernedwicaulllasr LJuonBcacottxiioonn (612.04"cm) LJuonBcacottxiioonn (104.2"cm) (51 - Viking VDOT | Installation Instructions - Page 11
. • Disconnect the electrical supply prior to servicing. • When removing the appliance for service, disconnect AC power supply and carefully remove is recommended that 3/4" or larger material be utilized to create a support platform for this appliance. CAUTION Avoid any damage to oven vents. The - Viking VDOT | Installation Instructions - Page 12
front facing of the wall or cabinet before you perform the installation. • It is recommended to use standard 2 x 4 support posts with a minimum of 3/4" (1.9 cm) solid base to support the oven. Support posts should be level with the floor line and well-secured to the base of the cabinet. Base cabinet - Viking VDOT | Installation Instructions - Page 13
HInestaadlllaintioen (cont.) 2 3 Open lower oven door completely. 4 Fold latches backward until locked in place LOOWFFER 5 Slowly close until latches stop door. 6 Lift door up and out. 7 Remove racks. Unscrew pallet screws from side of oven. 13 - Viking VDOT | Installation Instructions - Page 14
HInestaadlllaintioen (cont.) WARNING ELECTRICAL FIRE HAZARD Improper connection of aluminum house wiring to copper leads can result in an electrical hazard or fire. Use only connectors designed for joining copper to aluminum and follow the manufacturer's recommended procedure closely. 8a Neutral - Viking VDOT | Installation Instructions - Page 15
HInestaadlllaintioen (cont.) 11 12 UOPPFFER LOOWFFER Remove center grille by removing screws underneath grille. Push grille up and pull out. 13 Attach screws thru the framing from front of unit on both sides in the center and bottom. There are no mounting holes at the top LOOWFFER 14 Replace - Viking VDOT | Installation Instructions - Page 16
cycle check for more than 10 minutes with the oven racks and rack supports inside oven to avoid discoloration due to the high temperature. Any adjustments necessary that are a result of the installer not following instructions will be the responsibility of the installer, dealer or the end user of - Viking VDOT | Installation Instructions - Page 17
problem that you are having. If you are unable to obtain the name of an authorized service agency, or if you continue to have service problems, contact Viking Range, LLC at 1-888-(8454641), or write to: VIKING RANGE, LLC PREFERRED SERVICE - Viking VDOT | Installation Instructions - Page 18
18 - Viking VDOT | Installation Instructions - Page 19
19 - Viking VDOT | Installation Instructions - Page 20
Viking Range, LLC 111 Front Street Greenwood, Mississippi 38930 USA (662) 455-1200 For product information, call 1-888-(845-4641) or visit our web site at vikingrange.com F21300C EN (111518)
-
 1
1 -
 2
2 -
 3
3 -
 4
4 -
 5
5 -
 6
6 -
 7
7 -
8
-
9
-
10
-
11
-
12
-
13
-
14
-
15
-
16
-
17
-
18
-
19
-
20
 |
 |
Installation
Guide
7 SERIES
Professional TurboChef Speedcook Ovens
VSOT730
VDOT730