Viking VEWD530SS Installation Instructions - Page 6
General Information - warming drawer
 |
View all Viking VEWD530SS manuals
Add to My Manuals
Save this manual to your list of manuals |
Page 6 highlights
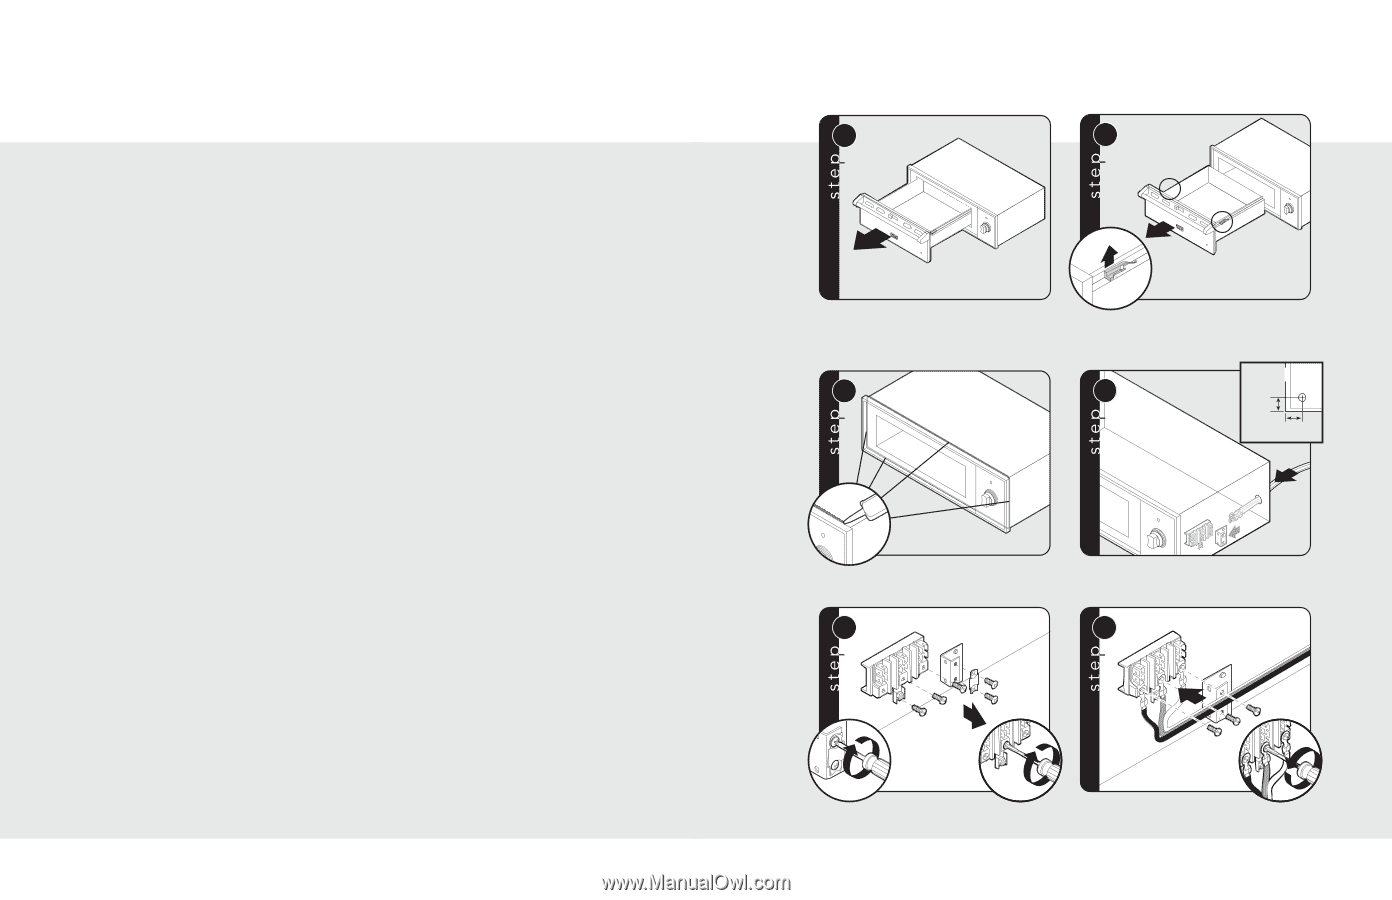
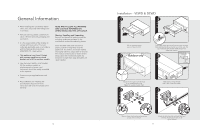
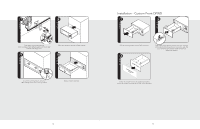
General Information • When installing this unit directly below other units, only install with Viking builtin products. • Remove warming drawer carefully from carton. Remove all loose packaging and accessories. • It is the responsibility of the installer to comply with local codes. If no local codes are applicable, wire in accordance with the National Electrical Code, ANSI/NFPA 70 - latest edition. • This appliance is not fused. Protect with a proper sized fuse or circuit breaker and a GFI for outdoor models. • Line disconnect switch, circuit breaker, GFI (for outdoor models) or plug/receptacle of power cord connection should be readily accessible to the operator. • Ground unit per applicable electrical codes. • Any installation not matching the specifications discussed in these instructions will void the manufacturer's warranty. READ AND FOLLOW ALL WARNING AND CAUTION INFORMATION WHEN INSTALLING THIS APPLIANCE. Moving, Handling and Unpacking Remove and discard all packing materials, including cardboard and tape on the outside and inside of the warming drawer. Some stainless steel parts may have a plastic protective wrap which must be peeled off. The interior should be washed thoroughly with hot, soapy water to remove film residues and any dust or debris before being used, then rinsed and wiped dry. Solutions stronger than soap and water are rarely needed. 10 Installation - VEWD & DEWD 1 2 Pull out warming drawer pan until fully extended. 3 Outdoor only 2 1 Slide finger along right and left side until you reach the black hand latches (located at the front of the rails). Pull up on both the right and left latches and pull out drawer pan support. Electrical opening (from rear) 4 2" (5.1 cm) 2" (5.1 cm) Apply silicone caulk around the back of the warming drawer trim. Note: For outdoor models ONLY. 5 Feed supply cord up through hole in rear of warming drawer. 6 1 2 1 1 2 Remove strain relief bracket and mounting screws on the terminals. Attach the white (neutral) and black (line) lead terminals. Attach ground wire to the center terminal. 11
-
 1
1 -
 2
2 -
 3
3 -
 4
4 -
 5
5 -
 6
6 -
 7
7 -
 8
8
 |
 |