Viking VGCC536 Installation Instructions - Page 9
Leg Installation, Leveling/Adjustments/Alignment
 |
View all Viking VGCC536 manuals
Add to My Manuals
Save this manual to your list of manuals |
Page 9 highlights
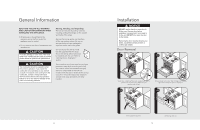
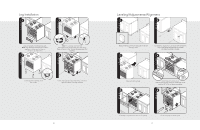
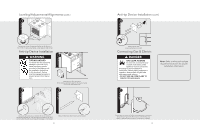
Leg Installation 1 2 Legs are packed in styrofoam top pack. Note: Legs should be installed near to where appliance is to be used, as they are not secure for long transit. 3 1 1 3 2 Note: It is strongly recommended that a pallet or lift jack be used rather than tilting. Raise unit about a foot. Unscrew temporary legs from couplings. 4 Screw legs into couplings on all four corners. Lower range gently to keep any undue strain from legs and internal mounting hardware. 16 Leveling/Adjustments/Alignment 1 2 Measure the four corners in cutout area to verify if flooring is level. 3 For uneven or sloped floors, level unit with metal shims only, as the adjustment required may exceed the thread available in the leg. 4 Move unit into opening. 5 (03.9/58"cm) Check that unit is level side to side and front to back. Side trim of the high corner must be 3/8" (0.95 cm) above countertop. 6 If leveling is required, move unit out of opening. 17 1 1 2 Lift unit and prop on wood blocks.
-
 1
1 -
2
-
3
-
 4
4 -
 5
5 -
 6
6 -
 7
7 -
 8
8 -
 9
9 -
 10
10 -
 11
11 -
 12
12
 |
 |
