Viking VGSU5366BSS Natural Gas Conversion Kit - NATVGC - Installation Instruct - Page 2
IMPORTANT-Please Read and Follow, Gas Conversion - parts
 |
View all Viking VGSU5366BSS manuals
Add to My Manuals
Save this manual to your list of manuals |
Page 2 highlights
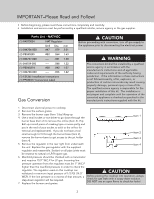
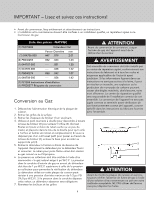
IMPORTANT-Please Read and Follow! • Before beginning, please read these instructions completely and carefully. • Installation and service must be performed by a qualified installer, service agency or the gas supplier. Parts List - NATVGC (1) PA070004 NAT Regulator (1) 044706-000 Drill Dia. mm #47 .079 2.01 (2) PB040255 #52 .064 1.63 (1) 044707-000 ---- .051 1.30 (1) 044709-000 (1) PB040274 ---- .048 1.22 #58 .042 1.07 (1) 044708-000 ---- .056 1.42 (1) F21265 Installation Instructions (1) PF030377 Conversion Label Gas Conversion CAUTION Before proceeding with conversion, turn off gas supply to the appliance prior to disconnecting the electrical power. WARNING This conversion kit shall be installed by a qualified service agency in accordance with the manufacturer's instructions and all applicable codes and requirements of the authority having jurisdiction. If the information in these instructions is not followed exactly, a fire, explosion, or production of carbon monoxide may result causing property damage, personal injury or loss of life. The qualified service agency is responsible for the proper installation of this kit. The installation is not proper and complete until the operation of the converted appliance is checked as specified in the manufacturer's instructions supplied with the kit. 1. Disconnect electrical power to cooktop. 2. Remove the surface grates. 3. Remove the burner caps (Item 1) by lifting up. 4. Use a small socket or nut driver to go down through the Item 1 burner base (Item 2) to remove the orifice (Item 3). (Tip: Ball up a small piece of masking tape or some putty and put in the end of your socket to stick to the orifice for removal and replacement). If you do not have a tool small enough to fit through the burner base (Item 2), Item 2 remove the burner base to get access to the jet holder (Item 4). Item 3 5. Remove the regulator in the rear right from underneath Item 4 the unit. Replace the gas regulator with the supplied regulator and reassemble. Sealant on all pipe joints must be resistive to natural or LP/Propane gas. 6. Manifold pressure should be checked with a manometer and requires 10.0" W.C.P for LP gas. Incoming line pressure upstream from the regulator must be 1" W.C.P. higher than the manifold pressure in order to check the regulator. The regulator used on this cooktop can withstand a maximum input pressure of 1/2 PSI (14.0" WCP). If the line pressure is in excess of that amount, a step-down regulator will be required. 7. Replace the burners and grates. CAUTION Before placing the cooktop into operation, always check for gas leaks with a soapy water solution. DO NOT use an open flame to check for leaks! 2
-
 1
1 -
 2
2 -
 3
3 -
 4
4 -
 5
5 -
 6
6 -
 7
7 -
 8
8
 |
 |
