Viking VSOC530 Installation Instructions - Page 11
Viking VSOC530 Manual
 |
View all Viking VSOC530 manuals
Add to My Manuals
Save this manual to your list of manuals |
Page 11 highlights
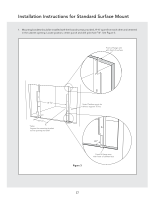
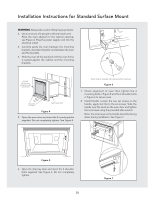
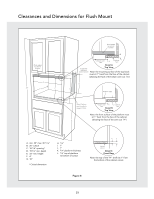
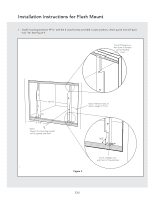
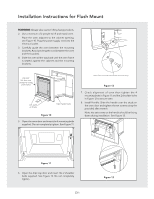
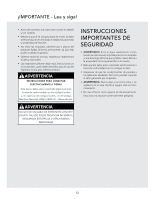
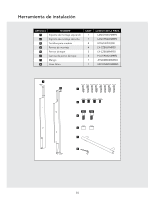
Installation Instructions for Flush Mount WARNING Always take caution lifting heavy products. 2. Use a minimum of 2 people to lift and install oven. Place the oven adjacent to the cabinet opening, see Figure 10. Plug the power supply cord into the electrical outlet. 3. Carefully guide the oven between the mounting brackets. Avoid pinching the cord between the oven and the brackets. 4. Slide the oven all the way back until the oven frame is seated against the cabinet and the mounting brackets. DO NOT lift this unit using the outer oven frame Lift point on frame Side Handle (x2) Figure 10 5. Open the oven door and insert the 4 mounting bolts supplied. Do not completely tighten. See Figure 11. Note: Slide on shoulder bolt sleeves before mounting Figure 12 7. Check alignment of oven then tighten the 4 mounting bolts in Figure 11 and the 2 shoulder bolts in Figure 12 to secure oven. 8. Install Handle: Slide the handle over the studs on the oven door and tighten the set screws using the provided allen wrench. Note: the set screws on the handle should be facing down during installation. See Figure 13. Figure 11 6. Open the drip tray door and insert the 2 shoulder bolts supplied. See Figure 12. Do not completely tighten. E11 Figure 13
-
 1
1 -
2
-
3
-
4
-
5
-
 6
6 -
 7
7 -
 8
8 -
 9
9 -
 10
10 -
 11
11 -
 12
12 -
 13
13 -
 14
14 -
 15
15 -
 16
16 -
17
-
18
-
19
-
20
-
21
-
22
-
23
-
24
-
25
-
26
-
27
-
28
-
29
-
30
-
31
-
32
-
33
-
34
-
35
-
36
 |
 |
