Viking VWH4878TSS Use and Care Manual - Page 5
Settings and Functions - outdoor series
 |
View all Viking VWH4878TSS manuals
Add to My Manuals
Save this manual to your list of manuals |
Page 5 highlights
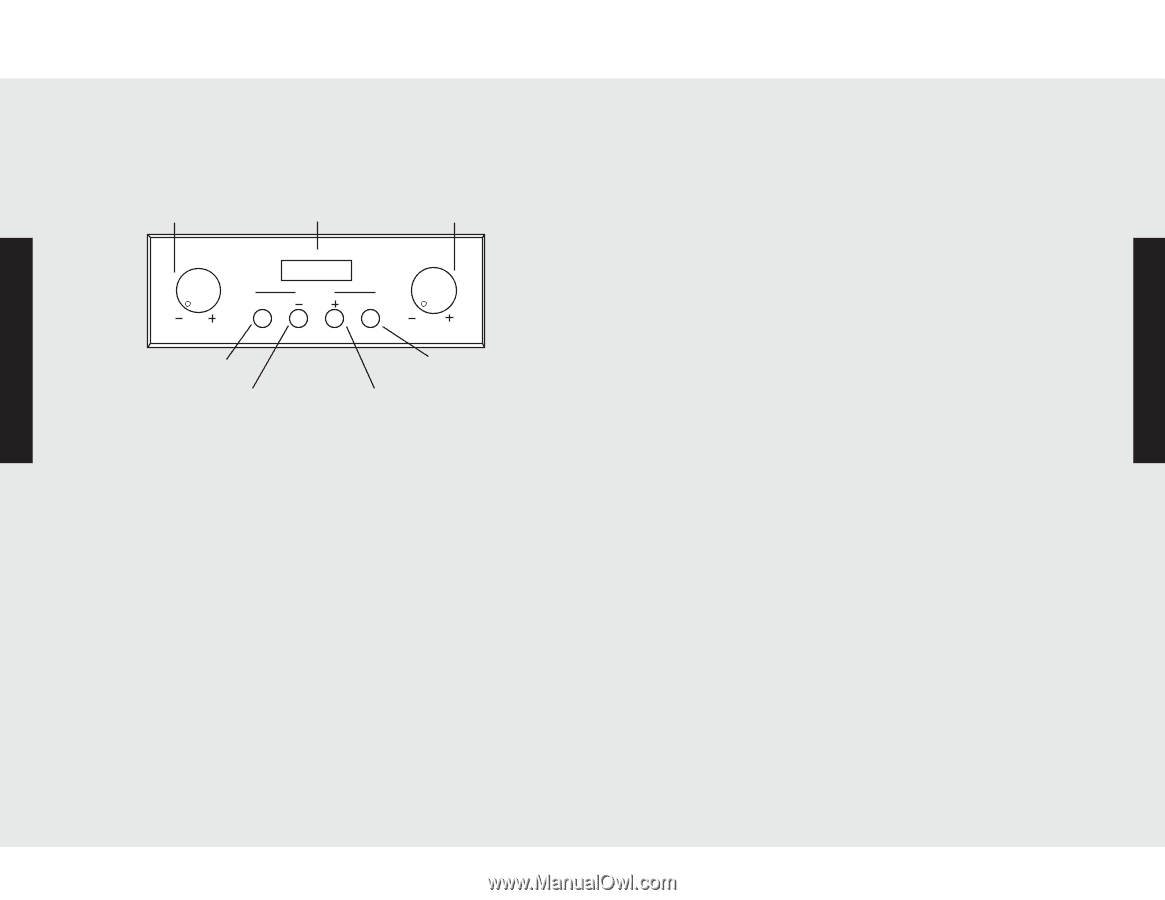
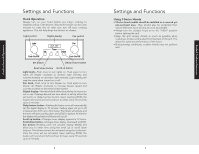
Product Controls/Operation Settings and Functions Hood Operation Always turn on your hood before you begin cooking to establish airflow in the kitchen. Also let the blower run for a few minutes to clear the air after you turn off your cooking appliance. This will help keep the kitchen air cleaner. Light control Digital display Fan control Light Fan 00:00 Timer Set Delay Push On/Off Push On/Off Set button Delay feature button Scroll down button Scroll up button Light knob-Push once to turn lights on. Push again to turn lights off. Rotate clockwise to increase light intensity and counterclockwise to decrease light intensity. Light setting will stay the same when turned on or off. Fan knob-Push once to turn blower on. Push again to turn blower off. Rotate clockwise to increase blower speed and counterclockwise to decrease blower speed. Digital display-Remains blank while timer/delay functions are not in use. Displays desired set time which is set by either the set button or delay function button. Upon reaching 00:00, the buzzer will sound and will continue to beep every 10 seconds up to 5 minutes. Delay feature button-Pushing this button once will automatically set the digital display to 10 minutes. Pushing again will go to 20 minutes and so forth, up to 30 minutes. The blower will activate and the timer will start counting down until 00:00 is reached. At this time the display will go blank and blower will cut off. Scroll up button-Changes timer display upward to 12 hours. Scroll down button-Changes timer display downward to 00:00. Set button-Pushing once will activate display (00:00) and allow you to enter time using the scroll up or scroll down buttons. The blower cannot be activated using the set button. Only the timer will be activated. Upon reaching 00:00, the buzzer will sound and will continue to beep every 10 seconds up to 5 minutes. 8 Settings and Functions Using T-Series Hoods • T-Series hood models should be installed in a covered yet non-enclosed area. They should also be protected from natural elements (such as rain) as much as possible. • Always turn the outdoor hood on to the "HIGH" position before lighting the grill. • Keep the grill canopy closed as much as possible when cooking so smoke is exhausted from the back of the grill. This allows for optimum performance of the hood. • During breezy conditions, outdoor hoods may not perform well. 9 Product Controls/Operation
-
 1
1 -
 2
2 -
 3
3 -
 4
4 -
 5
5 -
 6
6 -
 7
7 -
 8
8 -
 9
9 -
 10
10
 |
 |