Vivitar DVR 920HD DVR 920 Camera Manual - Page 17
Exposure Menu
 |
View all Vivitar DVR 920HD manuals
Add to My Manuals
Save this manual to your list of manuals |
Page 17 highlights
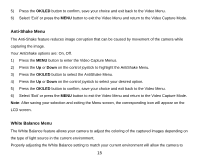
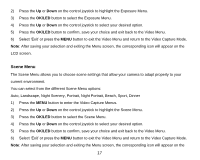
properly balance the colors in the images that are taken with your camera. You can select from the following White Balance options: Auto, Daylight, Cloudy, Fluorescent, Tungsten 1) Press the MENU button to enter the Video Capture Menus. 2) Press the Up or Down on the control joystick to highlight the White Balance Menu. 3) Press the OK/LED button to select the White Balance Menu. 4) Press the Up or Down on the control joystick to select your desired option. 5) Press the OK/LED button to confirm, save your choice and exit back to the Video Menu. 6) Select „Exit‟ or press the MENU button to exit the Video Menu and return to the Video Capture Mode. Note: After saving your selection and exiting the Menu screen, the corresponding icon will appear on the LCD screen. Exposure Menu The Exposure setting helps you control the amount of light that enters your camera‟s lens. This setting should be adjusted when the environment is lighter or darker than normal. When the environment has more light than is needed, reduce the exposure setting (by using the negative count) to reduce the amount of light allowed into the lens by your camera. If the environment has less light (darker) than is needed, increase the exposure setting (by using the positive + count) to increase the amount of light allowed into the lens by your camera. 1) Press the MENU button to enter the Video Capture menus. 16
-
 1
1 -
2
-
3
-
4
-
5
-
6
-
7
-
8
-
9
-
10
-
11
-
 12
12 -
 13
13 -
 14
14 -
 15
15 -
 16
16 -
 17
17 -
 18
18 -
 19
19 -
 20
20 -
 21
21 -
 22
22 -
23
-
24
-
25
-
26
-
27
-
28
-
29
-
30
-
31
-
32
-
33
-
34
-
35
-
36
-
37
-
38
-
39
-
40
-
41
-
42
-
43
-
44
-
45
-
46
-
47
-
48
-
49
-
50
-
51
-
52
-
53
-
54
-
55
-
56
-
57
 |
 |
