Vivitar T135 Camera Manual - Page 17
Flash Options, Hide/Show the LCD Icons
 |
View all Vivitar T135 manuals
Add to My Manuals
Save this manual to your list of manuals |
Page 17 highlights
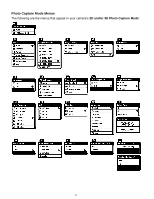
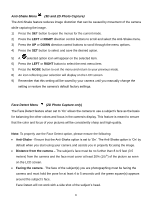
Flash Options There are several Flash options available on your camera. The options appear on the Photo Capture Mode LCD screen in sequence. To change the Flash mode, press the LEFT Quick Function button until you arrive at your desired settings. NOTE: Flash is available only in 2D Photo Capture Mode. There is no Flash in 3D Photo Capture mode. Important: When using Flash, stand between 8 to 10 feet away from the scene you would like to capture. Flash Type Forced Off (Default) A Auto Flash Forced On Description No flash will appear. Use this when you do not want to activate Flash. NOTE: A „Turn On Flash‟ message appears when the camera detects a need for flash. When this message appears, it is recommended to press the Flash/Up button and select one of the flash options: Auto Flash, Forced On or Red-Eye Reduction. When you want the camera to determine if Flash is needed, select Auto Flash. The flash will automatically turn on according to the lighting conditions. When the LED light stops blinking, the Flash is ready for use. Note: In some cameras, an initial flash appears to test your lighting conditions. If flash is needed, a second flash will appear upon taking the photo. The flash is enabled for each photo. Note: If you use this option in a well lit environment, your photo may be appear too bright/light (overexposed). Eliminates the red-eye effect in a photo caused by flash. Red Eye Reduction Hide/Show the LCD Icons The display of the icons on the LCD screen can be hidden or visible as desired. 1) Hold the MODE button for 2 seconds to hide the display of the icons on the screen. 2) Press the MODE button again to redisplay the icons on the screen. 16
-
 1
1 -
2
-
3
-
4
-
5
-
6
-
7
-
8
-
9
-
10
-
11
-
 12
12 -
 13
13 -
 14
14 -
 15
15 -
 16
16 -
 17
17 -
 18
18 -
 19
19 -
 20
20 -
 21
21 -
 22
22 -
23
-
24
-
25
-
26
-
27
-
28
-
29
-
30
-
31
-
32
-
33
-
34
-
35
-
36
-
37
-
38
-
39
-
40
-
41
-
42
-
43
-
44
-
45
-
46
-
47
-
48
-
49
-
50
-
51
-
52
-
53
-
54
-
55
-
56
-
57
-
58
-
59
-
60
-
61
-
62
-
63
-
64
 |
 |
