Vivitar T328 User Manual - Page 41
White Balance, Sharpness
 |
View all Vivitar T328 manuals
Add to My Manuals
Save this manual to your list of manuals |
Page 41 highlights
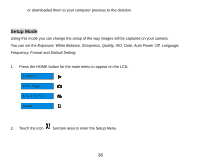
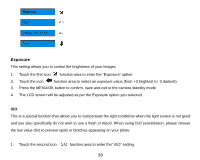
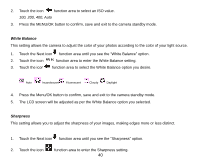
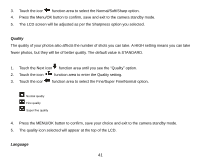
2. Touch the icon function area to select an ISO value. 100, 200, 400, Auto 3. Press the MENU/OK button to confirm, save and exit to the camera standby mode. White Balance This setting allows the camera to adjust the color of your photos according to the color of your light source. 1. Touch the Next icon function area until you see the "White Balance" option. 2. Touch the icon function area to enter the White Balance setting. 3. Touch the icon function area to select the White Balance option you desire. Auto Incandescent Fluorescent Cloudy Daylight 4. Press the Menu/OK button to confirm, save and exit to the camera standby mode. 5. The LCD screen will be adjusted as per the White Balance option you selected. Sharpness This setting allows you to adjust the sharpness of your images, making edges more or less distinct. 1. Touch the Next icon function area until you see the "Sharpness" option. 2. Touch the icon function area to enter the Sharpness setting. 40
-
 1
1 -
2
-
3
-
4
-
5
-
6
-
7
-
8
-
9
-
10
-
11
-
12
-
13
-
14
-
15
-
16
-
17
-
18
-
19
-
20
-
21
-
22
-
23
-
24
-
25
-
26
-
27
-
28
-
29
-
30
-
31
-
32
-
33
-
34
-
35
-
 36
36 -
 37
37 -
 38
38 -
 39
39 -
 40
40 -
 41
41 -
 42
42 -
 43
43 -
 44
44 -
 45
45 -
 46
46 -
47
-
48
-
49
-
50
-
51
-
52
-
53
-
54
-
55
-
56
-
57
-
58
-
59
-
60
-
61
-
62
 |
 |
