Vizio VW42LFHDTV10A VW42LF HDTV User Manual - Page 12
Vizio Remote Control, Guide, Power, Number Button Pad, Input - settings
 |
View all Vizio VW42LFHDTV10A manuals
Add to My Manuals
Save this manual to your list of manuals |
Page 12 highlights
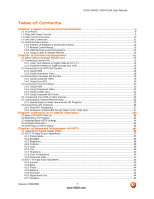
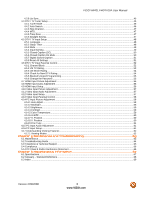
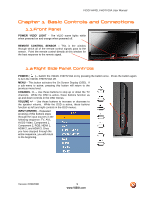
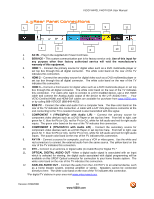
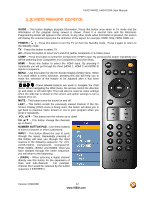
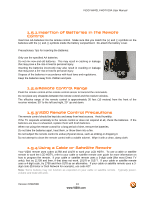
VIZIO VW42L FHDTV10A User Manual 1.5 VIZIO Remote Control GUIDE - This button displays program information. Press this button once when in TV mode and the information of the program being viewed is shown. Press it a second time and the Electronic Programming Guide will appear in the screen. In any other mode when this button is pressed, the screen will display the selected input plus the definition of the signal; for example, HDMI 720p, HDMI 1080i, etc. POWER ( ) - Press this button to turn the TV on from the Standby mode. Press it again to return to the Standby mode. TV - Press this button to select TV. AV - Press this button to select AV1 and AV2 (either Composite or S-Video) input. COMP - Press this button to select the Component (YPbPr) input. By pressing this button repeatedly you will be switching from Component 1 to Component 2 and vice versa. HDMI - Press this button to select the HDMI input. By pressing it repeatedly you will go through the three (HDMI 1, HDMI 2 and HDMI 3) inputs in sequence. MENU - Use this button for the On-Screen Display (OSD) menu. When it is used within a menu selection, pressing this key will help you to make the selection of the feature to be adjusted after it has been highlighted. -These labeled buttons are used to navigate the OSD menu. When navigating the OSD menu, the arrows control the direction up and down or left and right. They will also be used as value settings when the slide bar is shown on the screen and option settings to turn a feature off or on. MUTE - This button turns the sound on and off. LAST - This button recalls the previously viewed channel. If the OnScreen Display (OSD) menu is being used, this button will allow you to get back to previous menu screen or out to your program when you press it repeatedly. VOL ▲/▼ - This button turn the volume up or down. CH ▲/▼ - This button change the channels up or down. hen NUMBER BUTTON PAD - Use these buttons to select a channel or enter a password. INPUT - This button allows the user to cycle through the inputs. Repeatedly pressing of this button will step you through the input sources in the following sequence: TV, AV1, AV2/S-VIDEO, Component1, Component2, RGB, HDMI1, HDMI2, and HDMI3. Once you have stepped through the entire sequence, you will return to the beginning. - (DASH) - When selecting a digital channel directly use this button for the separation of main and sub-channels. For example, channel 28-2 would be selected by the button sequence 2 8 ENTER 2. Version 2/29/2008 12 www.VIZIO.com
-
 1
1 -
2
-
3
-
4
-
5
-
6
-
 7
7 -
 8
8 -
 9
9 -
 10
10 -
 11
11 -
 12
12 -
 13
13 -
 14
14 -
 15
15 -
 16
16 -
 17
17 -
18
-
19
-
20
-
21
-
22
-
23
-
24
-
25
-
26
-
27
-
28
-
29
-
30
-
31
-
32
-
33
-
34
-
35
-
36
-
37
-
38
-
39
-
40
-
41
-
42
-
43
-
44
-
45
-
46
-
47
-
48
-
49
-
50
-
51
-
52
-
53
-
54
-
55
-
56
-
57
-
58
-
59
-
60
-
61
-
62
-
63
-
64
-
65
-
66
-
67
-
68
-
69
-
70
 |
 |