Vtech 3-in-1 User Manual - Page 5
Assembly Instructions - smart wheels instructions
 |
View all Vtech 3-in-1 manuals
Add to My Manuals
Save this manual to your list of manuals |
Page 5 highlights
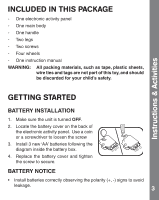
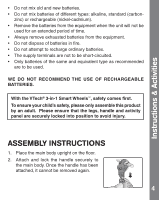
Instructions & Activities • Do not mix old and new batteries. • Do not mix batteries of different types: alkaline, standard (carbon- zinc) or rechargeable (nickel-cadmium). • Remove the batteries from the equipment when the unit will not be used for an extended period of time. • Always remove exhausted batteries from the equipment. • Do not dispose of batteries in fire. • Do not attempt to recharge ordinary batteries. • The supply terminals are not to be short-circuited. • Only batteries of the same and equivalent type as recommended are to be used. WE DO NOT RECOMMEND THE USE OF RECHARGEABLE BATTERIES. With the VTech® 3-in-1 Smart Wheels™, safety comes first. To ensure your child's safety, please only assemble this product by an adult. Please ensure that the legs, handle and activity panel are securely locked into position to avoid injury. ASSEMBLY INSTRUCTIONS 1. Place the main body upright on the floor. 2. Attach and lock the handle securely to the main body. Once the handle has been attached, it cannot be removed again. 4
-
 1
1 -
 2
2 -
 3
3 -
 4
4 -
 5
5 -
 6
6 -
 7
7 -
 8
8 -
 9
9 -
 10
10 -
 11
11 -
12
-
13
-
14
 |
 |
