Vtech DS6621-2 Quick Start Guide - Page 1
Vtech DS6621-2 Manual
 |
View all Vtech DS6621-2 manuals
Add to My Manuals
Save this manual to your list of manuals |
Page 1 highlights
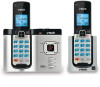
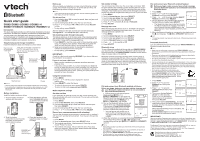
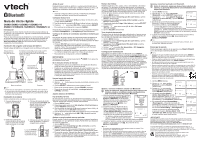
THIS SIDE UP / CE CÔTÉ VERS LE HAUT Battery Pack / Bloc-piles : (2.4V Ni-MH) WARNING / AVERTISSEMENT : DO NOT BURN OR PUNCTURE BATTERIES. NE PAS INCINÉRER OU PERCER LES PILES. Made in China / Fabriqué en chine Quick start guide DS6621/DS6621-2/DS6621-3/DS6621-4/ DS662V-1F/DS662V-1G/DS662V-1H/DS662V-1J Introduction This quick start guide provides you with the basic installation and setup instructions. A limited set of features are described in abbreviated form. You may refer to the Abridged user's manual provided in the product package for installation and operation instructions, or see the online Complete user's manual at www.vtechphones.com for complete installation and operation instructions. Telephone base and charger installation Install the telephone base and charger as shown below. Electrical outlet not controlled by a wall switch A DSL filter (not included) is required if you have DSL high-speed Internet service. The DSL filter must be plugged into the telephone wall jack. Electrical outlet not controlled by a wall switch Telephone line cord Telephone base Charger NOTES • Use only the power adapters and batteries supplied with this product. • If you subscribe to telephone service from a cable company or a VoIP service provider, contact your cable/VoIP service provider for more information. Battery installation Install the battery as shown below. 1. Plug the battery connector securely into the socket. 2. Place the battery with the label THIS SIDE UP facing up and the wires inside the battery compartment. THIS SIDE UP / CE CÔTÉ VERS LE HAUT Battery Pack / Bloc-piles : (2.4V Ni-MH) WARNING / AVERTISSEMENT : DO NOT BURN OR PUNCTURE BATTERIES. NE PAS INCINÉRER OU PERCER LES PILES. Made in China / Fabriqué en chine THIS SIDE UP / CE CÔTÉ VERS LE HAUT Battery Pack / Bloc-piles : (2.4V Ni-MH) WARNING / AVERTISSEMENT : DO NOT BURN OR PUNCTURE BATTERIES. NE PAS INCINÉRER OU PERCER LES PILES. Made in China / Fabriqué en chine THIS SIDE UP / CE CÔTÉ VERS LE HAUT Battery Pack / Bloc-piles : (2.4V Ni-MH) WARNING / AVERTISSEMENT : DO NOT BURN OR PUNCTURE BATTERIES. NE PAS INCINÉRER OU PERCER LES PILES. Made in China / Fabriqué en chine THIS SIDE UP / CE CÔTÉ VERS LE HAUT Battery Pack / Bloc-piles : (2.4V Ni-MH) WARNING / AVERTISSEMENT : DO NOT BURN OR PUNCTURE BATTERIES. NE PAS INCINÉRER OU PERCER LES PILES. Made in China / Fabriqué en chine 3. Slide the battery compartment cover towards the center of the handset until it clicks into place. 4. Place the handset in the telephone base or charger to charge. CHARGE light remains on when charging. Before use After you install your telephone or power returns following a power outage, the handset will prompt you to set the date and time, and the answering system through voice guide. NOTE • If you choose to set up the date and time, and the answering system at a later stage, you can do it manually. Set date and time 1. Use the dialing keys (0-9) to enter the month, date, and year, and then press SELECT. 2. Use the dialing keys (0-9) to enter the hour and minute. 3. Press or to choose AM or PM, and then press SELECT to save. • To skip setting, press CANCEL. After the setting for the date and time, the handset will display Voice guide to... and set up Ans sys? alternatively. Set answering system through voice guide This feature assists you to do the basic setup of the answering system. You can follow the voice guide to record your own announcement, set the number of rings and the message alert tone. 1. Press SELECT to start the voice guide for the answering system setup. You hear the voice prompt "Hello! This voice guide will assist you with the basic setup of your answering system." 2. Setup your answering system by inputting the designated numbers as instructed in the voice guide. • To skip setting, press CANCEL. IMPORTANT: Check for a dial tone by pressing /HOME. If you hear a dial tone, the installation is successful. If you do not hear a dial tone: • Make sure the installation procedures described above are properly done. • It may be a wiring problem. If you have changed your telephone service to digital service from a cable company or a VoIP service provider, the telephone line may need to be rewired to allow all existing telephone jacks to work. Contact your cable/VoIP service provider for more information. Using the handset menu 1. Press MENU. 2. Press or until the screen displays the desired feature menu. 3. Press SELECT to enter that menu. • To return to the previous menu, press CANCEL. • To return to idle mode, press and hold CANCEL. Basic telephone settings Set date and time If you subscribe to caller ID service, the day, month and time are set automatically with each incoming call. You can also set the date and time manually. 1. Press MENU. 2. Scroll to Set date/time, then press SELECT. 3. Use the dialing keys (0-9) to enter the month, date and year, then press SELECT. 4. Use the dialing keys (0-9) to enter the hour and minute. 5. Press or to choose AM or PM, then press SELECT. Record your own announcement with a handset You can use the preset announcement to answer calls, or replace it with your own recorded announcement. It can be up to 90 seconds in length. 1. Press MENU. 2. Scroll to Answering sys, then press SELECT twice. 3. The handset announces, "Announcement. Press play or press record." Press 7 to record. 4. The handset announces, "Record after the tone. Press stop when you are done." After the tone, speak towards the handset microphone. Press 5 when done. Set number of rings You can choose two, three, four, five or six rings; or toll saver. With toll saver selected, the answering system answers after two rings if you have new messages, or after four rings when there are no new messages. This enables you to check for new messages and avoid paying long distance charges when calling from out of your local area. 1. Press MENU. 2. Scroll to Answering sys, then press SELECT. 3. Scroll to Ans sys setup, then press SELECT. 4. Scroll to # of rings, then press SELECT. 5. Press or to choose 6, 5, 4, 3, 2 or Toll saver. 6. Press SELECT. Message alert tone When the message alert tone is set to on, and there is at least one new message, the telephone base beeps every 10 seconds. The message alert tone is preset to off. 1. Press MENU. 2. Scroll to Answering sys then press SELECT. 3. Scroll to Ans sys setup then press SELECT. 4. Scroll to Msg alert tone then press SELECT. 5. Press or to choose On or Off. 6. Press SELECT. Bluetooth setup To use a Bluetooth enabled cell phone with your DS6621/DS662V, you must first pair and connect your Bluetooth cell phone(s) with the telephone base. All DS6621/DS662V handsets can be used to make or answer calls on the cell line. Bluetooth wireless technology operates within a short range (a maximum of approximately 30 feet). When you pair a Bluetooth cell phone to the telephone base, place your Bluetooth cell phone closer to the telephone base to maintain sufficient signal strength. For optimal performance, keep your cell phone within 15 feet of the telephone base while using the cell line. Pair and connect your Bluetooth enabled cell phone Before you begin, make sure you have cellular coverage and i your Bluetooth enabled cell phone is not connected to any other Bluetooth device. 1. Choose a slot to pair the cell phone. Press and hold CELL 1 or CELL 2/HEADSET on the telephone base for about four seconds until you hear a confirmation tone. The CELL 1 or CELL 2/HEADSET light flashes. 2. Turn on the Bluetooth feature of your cell phone. Once your cell phone finds your VTech phone (VTech DS6621/DS662V), press the appropriate key on your cell phone to continue the pairing process. HANDSET 1 • Your cell phone may prompt you to enter the PIN of the telephone base. The default PIN of the telephone base is 0000. ECO 10:01AM 1 2 ANS ON 01/02 3. When the cell phone is connected to the telephone base, the corresponding status icon ( 1 or 2) displays. The corresponding device light ( CELL 1 or CELL 2/HEADSET) turns on. NOTES • The pairing process may take up to one minute. If the pairing process fails, try again. • The steps for the pairing process may vary for different cell phones. If this happens, follow the prompts on your cell phone and your DS6621/DS662V to complete the pairing process. • All cell phones that are connected to the telephone base are disconnected temporarily until the pairing process is completed. Pair and connect your Bluetooth enabled headset i Before you begin, make sure you have cellular coverage and your Bluetooth headset is not connected to any other Bluetooth device. 1. Press MENU. 2. Press or until the screen displays Bluetooth, and then press SELECT. 3. Press or until the screen displays Add BT Headset, and then press SELECT. Bluetooth ECO 1 2 ANS ON 4. Set your headset to discoverable mode. Once your handset finds your headset, press SELECT. Add BT headset • The telephone base may prompt you to enter ECO the PIN of the Bluetooth headset. The PIN for most Bluetooth devices is 0000 (refer to the user's manual of your headset), and then press SELECT. 1 2 ANS ON 5. When the Bluetooth headset is connected to the telephone base, the 2 icon displays. The CELL 2/HEADSET light turns on. NOTE • The pairing process may take up to one minute. If the pairing process fails, try again. Download phonebook You can download phonebook entries to your DS6621/DS662V via Bluetooth wireless technology. NOTES • Make sure the cell phone is paired to your DS6621/DS662V, on the device list and connected to the base before you download a cell phone phonebook. • Place your cell phone next to the telephone base when you download a cell phone phonebook to your DS6621/DS662V. • For certain cell phones, you may need to press a key on your cell phone to confirm the phonebook download. • Certain cell phones do not support SIM card download. If this is the case, transfer the contacts from your SIM card to your cell phone memory first. Then download from your cell phone memory. For more information on how to transfer contacts from your SIM card to your cell phone memory, see the user's manual of your cell phone. • For Android and Blackberry cell phones, you may also download your cell phone phonebook to your DS6621/DS662V via the VTech Contact Share application. Scan the QR code on the right , or go to www.vtechphones.com/apps/contact_share to download the application. 1. Press MENU. 2. Press or to scroll to Bluetooth and then press SELECT. Bluetooth ECO 1 2 ANS ON 3. Press or to scroll to Download PB and then press SELECT. Download PB 4. The screen displays Select a device for a few seconds. Press or to choose the desired device (if necessary), then press SELECT. ECO 1 2 ANS ON 5. The screen flashes Downloading... During the download process, the handset displays the progress. All other idle system handsets display Downloading... When the downloading process completes, the handset displays Entries added: XXX for a few seconds and then returns to the Bluetooth menu. Select a device ECO 1 2 ANS ON 1:Cell Phone A ECO 1 2 ANS ON Downloading... ECO 8 1 2 ANS ON Entries added: 118 ECO 1 2 ANS ON IMPORTANT! Refer to the online Complete user's manual for a full set of installation and operation instructions. For manual download or customer service, visit our website at www.vtechphones.com or call 1 (800) 595-9511. In Canada, go to www.vtechcanada.com or call 1 (800) 267-7377. The Bluetooth® word mark and logos are owned by Bluetooth SIG, Inc. and any use of such marks by VTech Holdings Limited is under license. VTech Holdings Limited is a member of Bluetooth SIG, Inc. Other trademarks and trade names are those of their respective owners. Specifications are subject to change without notice. © 2016 for VTech Communications, Inc. All rights reserved. 08/16. DS6621_QSG_V5.0 Document order number: 96-009639-050-100
-
 1
1 -
 2
2
 |
 |