Vtech Go Go Smart Wheels Garage User Manual - Page 7
Assembly Instructions - attachments
 |
View all Vtech Go Go Smart Wheels Garage manuals
Add to My Manuals
Save this manual to your list of manuals |
Page 7 highlights
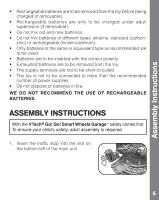
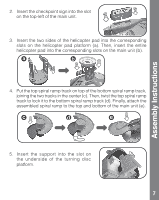
Assembly Instructions 2. Insert the checkpoint sign into the slot on the top-left of the main unit. 3. Insert the two sides of the helicopter pad into the corresponding slots on the helicopter pad platform (a). Then, insert the entire helicopter pad into the corresponding slots on the main unit (b). 4. Put the top spiral ramp track on top of the bottom spiral ramp track, joining the two tracks in the center (c). Then, twist the top spiral ramp track to lock it to the bottom spiral ramp track (d). Finally, attach the assembled spiral ramp to the top and bottom of the main unit (e). 5. Insert the support into the slot on the underside of the turning disc platform. 7
-
 1
1 -
 2
2 -
 3
3 -
 4
4 -
 5
5 -
 6
6 -
 7
7 -
 8
8 -
 9
9 -
 10
10 -
 11
11 -
 12
12 -
13
 |
 |

7
2.
Insert the checkpoint sign into the slot
on the top-left of the main unit.
3. Insert the two sides of the helicopter pad into the corresponding
slots on the helicopter pad platform (a). Then, insert the entire
helicopter pad into the corresponding slots on the main unit (b).
4.
Put the top spiral ramp track on top of the bottom spiral ramp track,
joining the two tracks in the center (c). Then, twist the top spiral ramp
track to lock it to the bottom spiral ramp track (d). Finally, attach the
assembled spiral ramp to the top and bottom of the main unit (e).
5. Insert the support into the slot on
the underside of the turning disc
platform.
Assembly Instructions