Vtech Kidizoom Princess Digital Camera User Manual - Page 9
Activities - disney
 |
View all Vtech Kidizoom Princess Digital Camera manuals
Add to My Manuals
Save this manual to your list of manuals |
Page 9 highlights
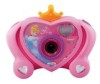
To avoid any potential damage to your Princess Digital Camera: • When the USB cable is not connected to the unit, please ensure the USB rubber cover on the unit is fully covering the USB port. • When the unit is not connected to a TV, please ensure the TV jack rubber cover is fitted in place. • Please ensure the SD card slot rubber cover is fitted in place. ACTIVITIES Activities 1. Camera MODE Press the Camera Mode button to go to Camera Mode. A. Photo Taking • In Camera Mode, user can look at the LCD screen to see the photo subject. • While holding the camera steady, press the Shutter/OK button on the top of the camera to take a picture. • You can scroll the Zoom Wheel up or down to increase or reduce the level of digital zoom. • You can also choose to add different photo frames to your photos, or stamps of Disney Princesses. Scroll the Up/Down Wheel to choose one option. After choosing an option, take a photo as usual and that frame or stamp will be added to the photo. If you don't want to add a border or stamp, press the Camera Mode button to remove it. Flash modes usage: Flash mode Optimum distance for using Low flash 1.5 - 2 feet Auto flash 2.5 - 3.5 feet High flash 3.5 - 8 feet • When the Princess Digital Camera is first turned ON, it will be set to autoflash mode. It will use the flash when it detects that it is necessary. When the flash is ready to use, a lightning bolt icon will display at the top left corner of the screen. To change your flash settings, press the Flash button to switch between autoflash , low flash , high flash or flash off . 9
-
 1
1 -
2
-
3
-
 4
4 -
 5
5 -
 6
6 -
 7
7 -
 8
8 -
 9
9 -
 10
10 -
 11
11 -
 12
12 -
 13
13 -
 14
14 -
15
-
16
-
17
-
18
-
19
 |
 |
