Vtech V.Smile Baby Infant Development System User Manual - Page 6
Instructions
 |
View all Vtech V.Smile Baby Infant Development System manuals
Add to My Manuals
Save this manual to your list of manuals |
Page 6 highlights
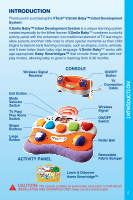
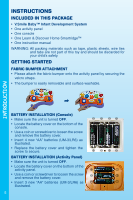
INTRODUCTION INSTRUCTIONS INCLUDED IN THIS PACKAGE • V.Smile Baby™ Infant Development System • One activity panel • One console • One Learn & Discover Home Smartridge™ • One instruction manual WARNING: All packing materials such as tape, plastic sheets, wire ties and tabs are not part of this toy and should be discarded for your child's safety. GETTING STARTED FABRIC BUMPER ATTACHMENT • Please attach the fabric bumper onto the activity panel by securing the velcro straps. • The bumper is easily removable and surface washable. BATTERY INSTALLATION (Console) • Make sure the unit is turned OFF. • Locate the battery cover on the bottom of the console. • Use a coin or screwdriver to loosen the screw and remove the battery cover. • Insert 4 new "AA" batteries (UM-3/LR6) as illustrated. • Replace the battery cover and tighten the screw to secure. BATTERY INSTALLATION (Activity Panel) • Make sure the unit is turned OFF. • Locate the battery cover on the bottom of the activity panel. • Use a coin or screwdriver to loosen the screw and remove the battery cover. • Insert 3 new "AA" batteries (UM-3/LR6) as illustrated. 5
-
 1
1 -
 2
2 -
 3
3 -
 4
4 -
 5
5 -
 6
6 -
 7
7 -
 8
8 -
 9
9 -
 10
10 -
 11
11 -
 12
12 -
13
-
14
-
15
-
16
 |
 |
