Vtech VCS752 Quick Start Guide - Rev 1 - Page 2
Call history, Make a call, Answer a call, Redial a call, Mute a call, Volume, Temporarily silencing - administrator and provisioning guide
 |
View all Vtech VCS752 manuals
Add to My Manuals
Save this manual to your list of manuals |
Page 2 highlights
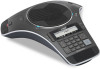
Make a call Make a call on the base unit 1. Press on the base unit. 2. When you hear a dial tone, dial the number with the dialing keys (0-9, , or ). If you do not hear a dial tone: • Recheck the installation diagram and connections to the unit. • Ensure the unit is correctly configured with the correct SIP account information. For more information, see the VCS752 Administrator and Provisioning Guide. • Consult your service provider if you require additional user accounts or if you suspect a service disruption is at fault. Use a wireless mic during a call 1. During a call, lift a wireless mic from the base unit charging cradle, and then put it on the table. The status indicator on the wireless mic turns green. 2. Speak towards the microphone on the wireless mic. Operating range This conference phone operates with the maximum power allowed by the Federal Communications Commission (FCC). Even so, this wireless mic and base unit can communicate over a certain distance, which can vary with the locations of the base unit and wireless mic, the weather, and the layout of your office. When the wireless mic is out of range, its status indicator flashes red slowly. The wireless mic will sleep after being out of range for 30 minutes. Therefore, you should always return the wireless mic to the charging cradle after use. If there is an incoming call while the wireless mic is out of range, the incoming call green light may not flash on the wireless mic. If it flashes, the call may not connect well when you press on the base unit. Move the wireless mic closer to the base unit, and then press on the base unit to answer the call. If the wireless mic moves out of range during a telephone conversation, there may be interference. To improve reception, move closer to the base unit. Answer a call To answer an incoming call, either: • Press on the base unit. • Press . Redial a call 1. From the idle screen, press the Call Log soft key. If necessary, press the u navigation key to view the soft key. The Call history menu appears. 2. Select the All calls, Missed calls, Received calls, or Dialed calls list. 3. On the list you are viewing, press the q or p navigation key to view the entry you want to dial. 4. Press to dial the number. Mute a call The mute function allows you to hear the other party while the other party cannot hear you. To mute a call: • During a call, press MUTE ALL on the base unit or a wireless mic. The status indicators on the base and offcradle wireless mics turn red. All microphones in the system are muted until the mute function is turned off. To take the call off mute: • Press MUTE ALL on the base unit or a wireless mic to enable all microphones in the system. The status indicators turn green. Volume During a call, press or to adjust the listening volume (1-10). • For best performance, speak to the microphone on the wireless mic at a distance of no more than 3 feet. • Always return the wireless mics to the charging cradles after use. Temporarily silencing the ringer When the base unit is ringing, you can temporarily silence the ringer of the base unit without disconnecting the call. The next call rings normally at the preset volume. To silence the ringer: • Press MUTE ALL on the base unit. 3-way conference To create a conference call: 1. Press on the base unit. 2. When you hear a dial tone, dial the number of the first call. 3. When the first call is connected, press . The Conference with... screen appears and the current call is put on hold. 4. Enter the new outgoing call number. 5. When the second call is connected, press . A 3-way conference is established. End a call To end a call, either: • Press on the base unit. • Press End . Directory setup The directory can store up to 200 entries. Add a directory entry 1. Press MENU when the base unit is not in use. 2. With Features highlighted, press SELECT. 3. Press to highlight Directory, and then press SELECT. 4. Highlight the Directory to which you want to add entries (Local or Blacklist), and then press SELECT. The directory appears, showing the first entry (sorted alphabetically by first name). 5. When viewing a directory entry, press t or u until the Add soft key appears. 6. Press Add . A blank directory entry appears. 7. Use the dial pad keys to enter the first name, last name, and contact numbers. • Press the middle soft key ( , , or ) to switch between entering upper-case letters, lower-case letters, and numbers. • Press Backspc to delete incorrect characters. 8. After completing a line, press q to move to the next line. 9. When you have entered the desired information and selected the ringtone you want to use for this contact, press Save . Edit a directory entry 1. When viewing the desired directory entry, press t or u until the Edit soft key appears. 2. Press Edit . The directory entry edit screen appears. 3. Use the dial pad keys to change the first name, last name, and contact numbers as desired. • You can edit the name and numbers, change the ringtone, and select the line that the directory entry will use to dial out. • Press the middle soft key ( , , or ) to switch between entering upper-case letters, lower-case letters, and numbers. • Press Backspc to delete incorrect characters. • After completing a line, press q to move to the next line. 4. Press Save . Call history The call history provides available name and number information for the last 200 incoming and outgoing calls. The newest entries replace the oldest. You can view call history information on separate lists for all calls, missed calls only, received (answered) calls only, and dialed calls. Missed call indicator When there are calls that have not been answered, the screen displays XX missed call(s.) When you press or view the call history, the missed call screen goes away. Viewing the call history 1. When the phone is idle, press MENU. 2. With Features highlighted, press SELECT. 3. Press q to highlight Call history, and then press SELECT. The Call history screen appears. 4. Press q to highlight the desired call history folder. 5. Press View to see call history entries in the highlighted folder. The first entry appears. 6. Press q to view more entries. Alternate method: To view the call history when the phone is idle, press t or u until the Call Log soft key appears, and then press Call Log . IMPORTANT! Refer to the user's manual for a full set of installation and operation instructions. For customer service, visit our website at businessphones.vtech.com or call 1 (888) 370-2006. Specifications are subject to change without notice. © 2016 for VTech Communications, Inc. All rights reserved. Rev. 1 12/16.
-
 1
1 -
 2
2
 |
 |
