Weider Flex Ez1 Gym English Manual - Page 12
Bearing Pulley
 |
View all Weider Flex Ez1 Gym manuals
Add to My Manuals
Save this manual to your list of manuals |
Page 12 highlights
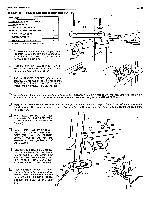
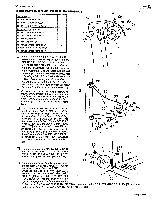
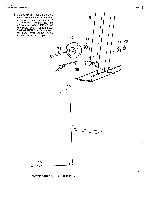
WEEDER HEALTH and FITNESS PAGE12 COMPLETING THE CABLE ASSEMBLY PART NAME QTY 32 31/2" BEARING PULLEY 2 33 2 7/8" STANDARD PULLEY 2 42 1/4" LONG METAL SPACER 1 43 11/16" LONG BUSHING 3 44 3/8" LONG METAL SPACER 2 17 73 31 31 7 43 35 45 5/8" LONG METAL SPACER 1 70 3/8" NYLON LOCK NUT 4 71 3/8" FLAT WASHER 6 73 3/8" X 3 1/4" HEX HEAD BOLT 2 76 318" X 2 114" HEX HEAD BOLT 1 42 32 75 3/8" X 2 1/2" HEX HEAD BOLT 1 Go first to the top of the UPRIGHT (2) and assemble the CABLE (35) on top of a 3 1/2" BEARING PULLEY (32). Insert the two METAL SPACER (42 - 43) on each side of the 3 1/2" BEARING PULLEY (32) as shown in the illustration. Bolt the Pulley and the LAT HOOKS (31) into the UPRIGHT U-BRACKET (17) using a 318" X 3 1/4" HEX HEAD BOLT (73) and bolting through a Lat Hook, then through the U-Bracket, the Pulley, the other side of the U-Brachet, and another Lat Hook. Secure with a 3/8" NYLON LOCK NUT (70). Proceed to the back of the Upright checking to 2 make sure the CABLE (35) is on the top of the small 2 7/8" STANDARD PULLEY (33) on the right. Pull the loop created in the Cable back to the long square hole in the LEVER ARM (20). 2 33 33 34 Place a 2 7/8" STANDARD PULLEY (33) into the loop of the CABLE (35) and add the CABLE TRAP BRACKET (34) so that the "L-shaped" end is to the bottom of the Pulley. Insert the 11/16" LONG BUSHING (43) into the center of the Pulley. Place a 3/8" FLAT WASHER (71) onto the 3/8" X 2 114" HEAD BOLT (76) and then a 3/8" LONG METAL SPACER (44). Place the Pulley assembly Into the opening and insert the bolt assembly through and add another 3/8" LONG METAL SPACER (44), and a 3/8" FLAT WASHER (71). Secure with a 3/8" NYLON LOCK NUT (70). El Pull the slack from the CABLE (35) back to the back of the UPRIGHT (2) to the small 2 7/8" STANDARD PULLEY (33) on the left making sure it goes over the top of the Pulley. 20 O 43 3 4 4 71 76 70 71 44 70 33 71 !.- 75 71 El Go down to the base of the Upright and again pull the slack out of the CABLE (35) through the hole. Insert the 11/16" LONG BUSHING (43) into a 2 7/8" STANDARD PULLEY (33). Bolt the 2 7/8" STANDARD PULLEY (33) using a 3/8" X 2 1/2" HEX HEAD BOLT (75) into the lower hole in the 35 Upright trapping the Cable underneath the Pulley. Insert the two 318" FLAT WASHER (71) on each side of the 2 7/8" STANDARD PULLEY (33) as shown • in the illustration. Secure with a 3/8" NYLON LOCK NUT (70).
-
 1
1 -
2
-
3
-
4
-
5
-
6
-
 7
7 -
 8
8 -
 9
9 -
 10
10 -
 11
11 -
 12
12 -
 13
13 -
 14
14 -
 15
15 -
 16
16
 |
 |
