Weider Pro 440 English Manual - Page 9
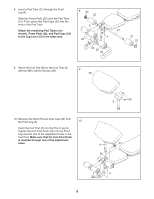
Make sure that the Curl Post Knob
 |
View all Weider Pro 440 manuals
Add to My Manuals
Save this manual to your list of manuals |
Page 9 highlights
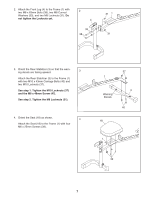
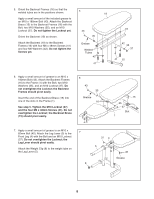
8. Insert a Pad Tube (21) through the Front Leg (4). Slide two Foam Pads (22) onto the Pad Tube (21). Then, press two Pad Caps (23) into the ends of the Pad Tube. Attach the remaining Pad Tubes (not shown), Foam Pads (22), and Pad Caps (23) to the Leg Lever (5) in the same way. 8 23 22 5 22 21 4 23 22 23 22 23 9. Attach the Curl Pad (20) to the Curl Post (6) with two M6 x 25mm Screws (39). 9 20 10. Remove the 50mm Round Inner Cap (26) from the Front Leg (4). 10 Insert the Curl Post (6) into the Front Leg (4). Tighten the Curl Post Knob (24) into the Front Leg and into one of the adjustment holes in the Curl Post. Make sure that the Curl Post Knob is inserted through one of the adjustment holes. 39 6 6 24 26 4 9
-
 1
1 -
2
-
3
-
 4
4 -
 5
5 -
 6
6 -
 7
7 -
 8
8 -
 9
9 -
 10
10 -
 11
11 -
 12
12 -
 13
13 -
 14
14 -
15
-
16
 |
 |

9
8.
Insert a Pad Tube (21) through the Front
Leg (4).
Slide two Foam Pads (22) onto the Pad Tube
(21). Then, press two Pad Caps (23) into the
ends of the Pad Tube.
Attach the remaining Pad Tubes (not
shown), Foam Pads (22), and Pad Caps (23)
to the Leg Lever (5) in the same way.
9.
Attach the Curl Pad (20) to the Curl Post (6)
with two M6 x 25mm Screws (39).
10. Remove the 50mm Round Inner Cap (26) from
the Front Leg (4).
Insert the Curl Post (6) into the Front Leg (4).
Tighten the Curl Post Knob (24) into the Front
Leg and into one of the adjustment holes in the
Curl Post.
Make sure that the Curl Post Knob
is inserted through one of the adjustment
holes.
8
9
10
23
23
20
6
39
21
22
22
22
22
4
5
23
23
6
26
4
24