Weider Pro 800 English Manual - Page 7
Warning - weight set
 |
View all Weider Pro 800 manuals
Add to My Manuals
Save this manual to your list of manuals |
Page 7 highlights
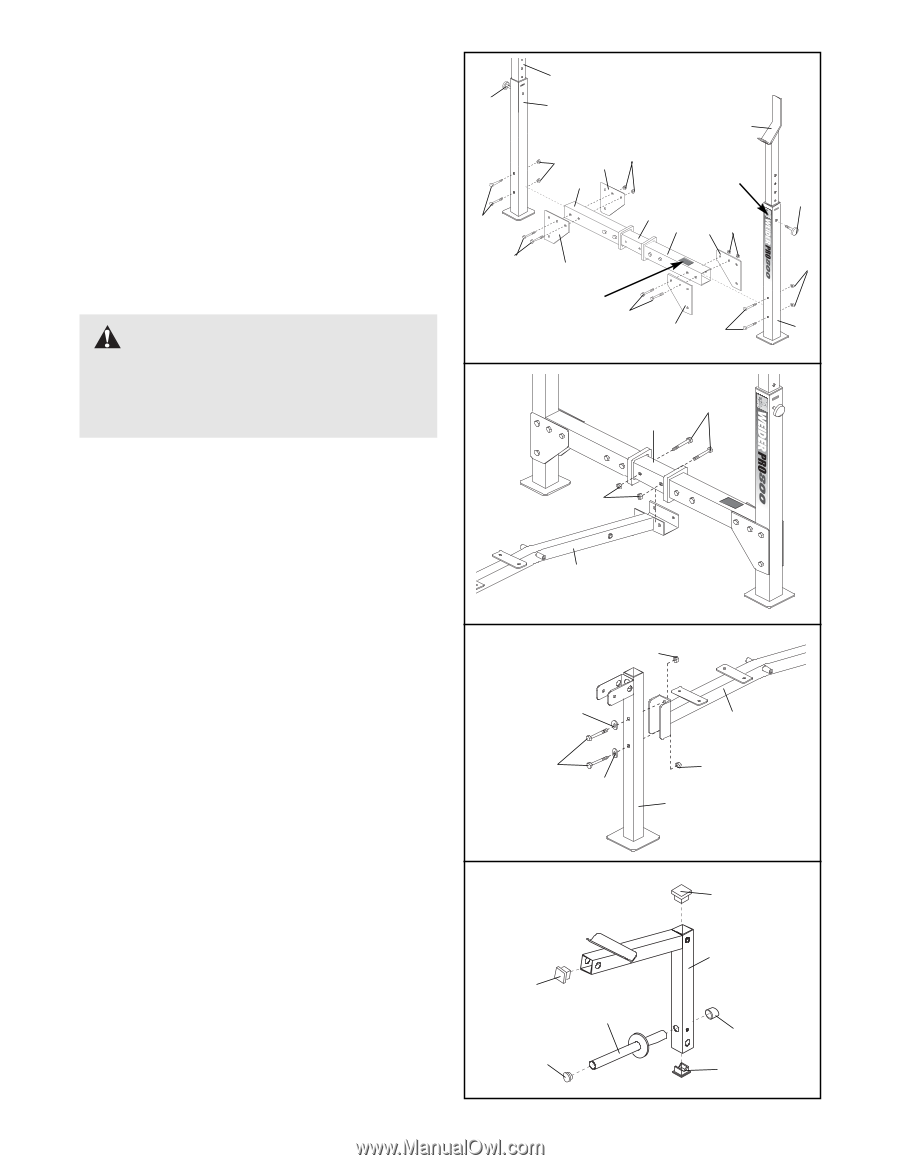
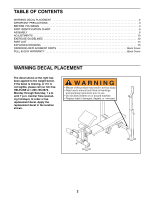
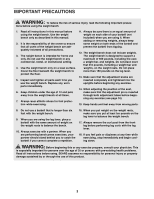
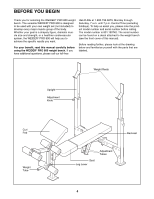
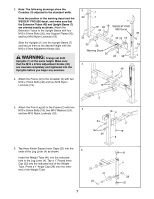
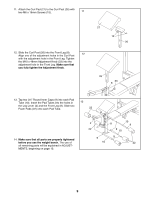
3. Note: The following drawings show the 3 Crossbar (3) adjusted to the standard width. 1 Note the position of the warning decal and the 30 WEIDER® PRO 800 decal, and make sure that the Extension Tubes (43) and Upright Bases (7) are oriented exactly as shown. Attach the Extension Tubes to the Upright Bases with four M10 x 81mm Bolts (35), two Support Plates (20), and four M10 Nylon Locknuts (19). 35 7 1 19 20 19 WEIDER® PRO 43 800 Decal 30 3 43 20 19 Slide the Uprights (1) into the Upright Bases (7) and secure them at the desired height with the 35 20 19 M10 x 67mm Adjustment Knobs (30). Warning Decal WARNING: Always set both 35 20 35 7 Uprights (1) at the same height. Make sure that the M10 x 67mm Adjustment Knobs (30) 4 are inserted completely and tightened into the Uprights before you begin any exercise. 40 3 ® ® 4. Attach the Frame (2) to the Crossbar (3) with two M10 x 72mm Bolts (40) and two M10 Nylon Locknuts (19). 19 5. Attach the Front Leg (8) to the Frame (2) with two M10 x 65mm Bolts (18), two M10 Washers (24), 5 and two M10 Nylon Locknuts (19). 2 19 24 18 24 2 19 8 6. Tap three 45mm Square Inner Caps (21) into the ends of the Leg Lever (4) as shown. 6 Insert the Weight Tube (41) into the indicated hole in the Leg Lever (4). Tap a 1" Round Inner Cap (23) into the indicated end of the Weight Tube. Press a 1" Angle Cap (29) onto the other end of the Weight Tube. 21 41 23 7 21 4 29 21
-
 1
1 -
 2
2 -
 3
3 -
 4
4 -
 5
5 -
 6
6 -
 7
7 -
 8
8 -
 9
9 -
 10
10 -
 11
11 -
 12
12 -
13
-
14
-
15
-
16
 |
 |