Weslo 400 Bench Uk Manual - Page 9
hole in the Left Butterfly Arm 36. Secure the Pad
 |
View all Weslo 400 Bench manuals
Add to My Manuals
Save this manual to your list of manuals |
Page 9 highlights
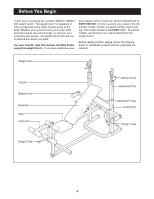
11. Press a 19mm Round Inner Cap (44) into each end of the Butterfly Pad Tube (37). 11 Slide the Butterfly Pad Tube (37) into the indicated hole in the Left Butterfly Arm (36). Secure the Pad Tube with an M8 x 52mm Bolt (6), a 13mm x 10mm Spacer (39), two M8 Washers (23), and an M8 Nylon Locknut (7). Wet then end of the Butterfly Pad Tube (37) with soapy water. Slide a Small Foam Pad (46) onto the Butterfly Pad Tube. 36 44 46 44 37 4 6 23 39 4 23 7 Press a 38mm Square Inner Cap (4) into each end of the Left Butterfly Arm (36). 12. Press two 29mm Bushings (42) into the indicated 12 welded tube on the "H"-frame (5). Slide the tube on the Left Butterfly Arm (36) into the Bushings. Note: Make sure the Plastic Spacer (33) is outside the "H"-frame (5). Use a standard screwdriver to insert a Spring Clip (43) into the end of the tube on the Left Butterfly Arm 49 (36), so that the button on the Spring Clip snaps into the hole in the tube. Tube 42 Tube 33 49 43 42 5 36 Press a 22mm Round Inner Cap (41) into each end of the tube on the Left Butterfly Arm (36). 13 Repeat steps 10 through 12 for the Right Butterfly Arm (45, not shown). 10 13. Attach the Backrest Brackets (11) to the Backrest (10) with three M6 x 16mm Screws (9). Do not tighten the Screws yet. 9 9 Make sure that the Backrest Brackets (11) are ori- ented exactly as shown in the drawing. Note that the threaded nuts in the Backrest (10) are closer to one end of the Backrest. The round holes in the Backrest Brackets must be pointed towards this end of the Backrest, so that they extend 9 beyond the Backrest. 14 14. Insert the Adjustment Tube (12) into the centre set of adjustment holes in the "H"-frame (5). Rotate the Adjustment Tube to the locked position, with the lock- 10 ing pin wrapped around the "H"-frame. Rest one end of the Backrest (10) on the Adjustment Tube (12). Slide the Backrest Bracket (11) that is 11 attached with two screws onto the welded pin on the Bench Frame (8). Then, pivot the other Backrest Bracket over the welded pin. Fasten the Backrest Bracket to the Backrest with the remaining M6 x 16mm Screw (9). Tighten all four Screws in the Backrest Brackets. Pin 9 9 11 Round Holes 12 5 8 11
-
 1
1 -
2
-
3
-
 4
4 -
 5
5 -
 6
6 -
 7
7 -
 8
8 -
 9
9 -
 10
10 -
 11
11 -
 12
12 -
 13
13 -
 14
14 -
15
-
16
 |
 |
