Weslo Cadence 10.0s Treadmill English Manual - Page 8
tfiere
 |
View all Weslo Cadence 10.0s Treadmill manuals
Add to My Manuals
Save this manual to your list of manuals |
Page 8 highlights
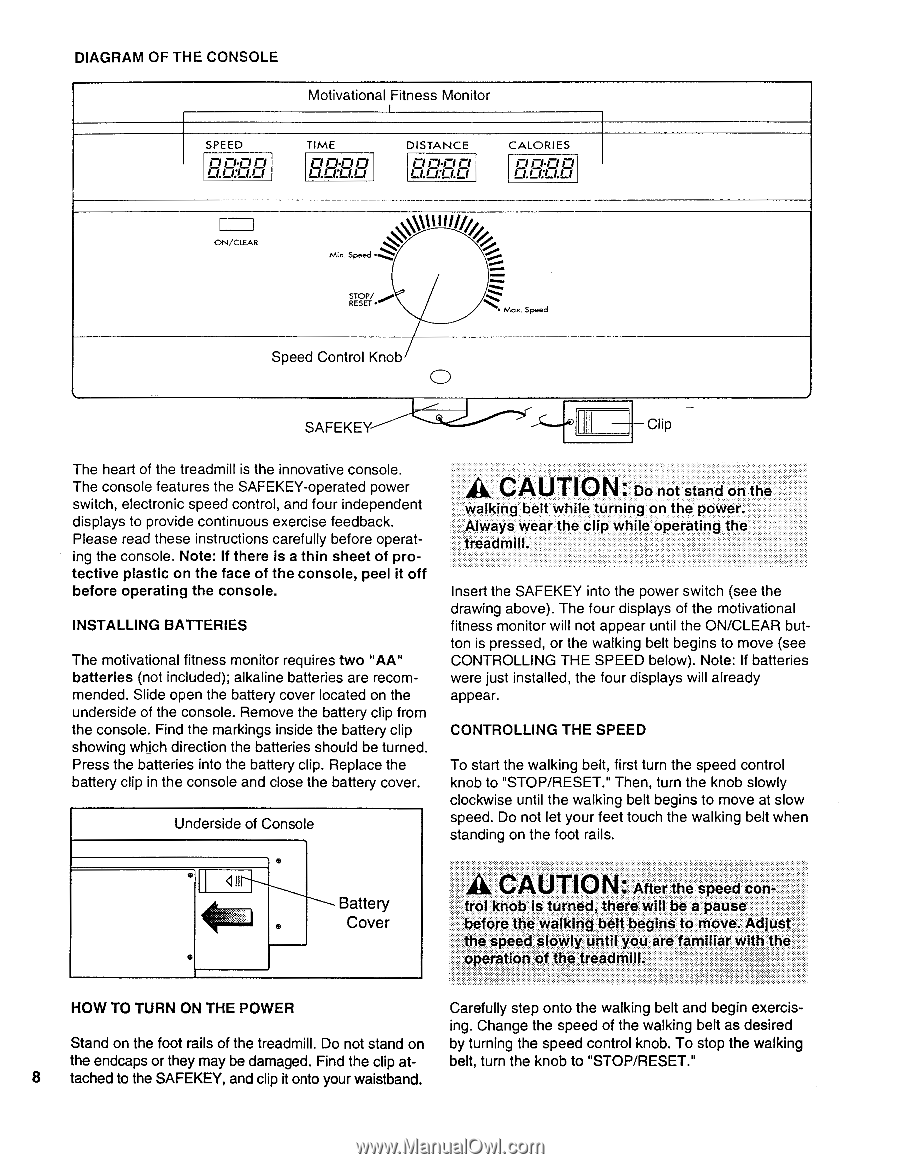
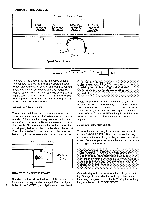
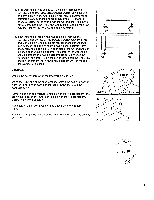
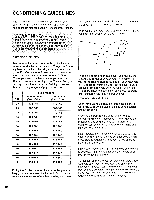
DIAGRAM OF THE CONSOLE Motivational Fitness Monitor I SPEED rs rs.rs ri ►I 1.1 1:1 1.1 1 TIME 0 ri.ri 0 i trki Li 1 DISTANCE ri rtrs ri i Li cal i CALORIES FIFI•rlil i to cal 1 ON/CLEAR \WM/ Min. Speed STOP RESET • mse • Max. Speed Speed Control Knob 0 SAFEKEY Clip The heart of the treadmill is the innovative console. The console features the SAFEKEY-operated power switch, electronic speed control, and four independent displays to provide continuous exercise feedback. Please read these instructions carefully before operating the console. Note: If there is a thin sheet of protective plastic on the face of the console, peel it off before operating the console. INSTALLING BATTERIES The motivational fitness monitor requires two "AA" batteries (not included); alkaline batteries are recommended. Slide open the battery cover located on the underside of the console. Remove the battery clip from the console. Find the markings inside the battery clip showing which direction the batteries should be turned. Press the batteries into the battery clip. Replace the battery clip in the console and close the battery cover. Underside of Console A CAUTION: Do not stand on the walking belt while turning on the power. Always wear the clip while operating the treadmill. Insert the SAFEKEY into the power switch (see the drawing above). The four displays of the motivational fitness monitor will not appear until the ON/CLEAR button is pressed, or the walking belt begins to move (see CONTROLLING THE SPEED below). Note: If batteries were just installed, the four displays will already appear. CONTROLLING THE SPEED To start the walking belt, first turn the speed control knob to "STOP/RESET." Then, turn the knob slowly clockwise until the walking belt begins to move at slow speed. Do not let your feet touch the walking belt when standing on the foot rails. II v. A CAUTION•- After the speed con- Battery trol knob is tUrned, tfiere wiii be a pause Cover before the walking belt begins to move. Adjust the speed slowly until you are familiar with the operation of the treadmill.. HOW TO TURN ON THE POWER Carefully step onto the walking belt and begin exercis- ing. Change the speed of the walking belt as desired Stand on the foot rails of the treadmill. Do not stand on by turning the speed control knob. To stop the walking the endcaps or they may be damaged. Find the clip at- belt, turn the knob to "STOP/RESET." 8 Cached to the SAFEKEY, and clip it onto your waistband.
-
 1
1 -
2
-
 3
3 -
 4
4 -
 5
5 -
 6
6 -
 7
7 -
 8
8 -
 9
9 -
 10
10 -
 11
11 -
 12
12 -
 13
13 -
14
-
15
-
16
 |
 |