Weslo Cadence 1015 English Manual - Page 5
Assembly
 |
View all Weslo Cadence 1015 manuals
Add to My Manuals
Save this manual to your list of manuals |
Page 5 highlights
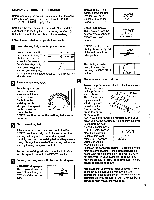
ASSEMBLY Assembly requires two people. Set the treadmill in a cleared area and remove the packing materials. Do not dispose of the packing materials until assembly is completed. Assembly requires the included alien wrench a phillips screwdriver ..---0=1) (not included) . 1. With the help of a second person, carefully lay the treadmill on its right side. (See the drawing on page 4 to identify the right side, if necessary.) Insert one of the Extension Legs (67) into the treadmill as shown. Make sure that the Base Pad (24) is on the indicated side of the Extension Leg. Using the included Allen Wrench (95), attach the Extension Leg with an Extension Leg Screw (57). 57 67 24 _1,95 Attach the other Extension Leg (67) as described above. With the help of a second person, carefully raise the treadmill to the upright position so the Extension Legs (67) are resting flat on the floor. 67 24 57 2. Hold the treadmill firmly with both hands, and lower the treadmill to the floor. Caution: To avoid pinching your hands, do not hold the treadmill in the locations indicated by the arrows. To decrease the possibility of injury, bend your legs and keep your back straight. 2 ( Do not hold here 3. Attach the Storage Latch (27) to the left Upright (28) with two Latch Screws (26). Be careful not to overtighten the 3 Latch Screws. 27 28 5
-
 1
1 -
 2
2 -
 3
3 -
 4
4 -
 5
5 -
 6
6 -
 7
7 -
 8
8 -
 9
9 -
 10
10 -
 11
11 -
12
-
13
-
14
-
15
-
16
-
17
-
18
-
19
 |
 |
