Weslo Cadence 3180 English Manual - Page 11
Spring/foot
 |
View all Weslo Cadence 3180 manuals
Add to My Manuals
Save this manual to your list of manuals |
Page 11 highlights
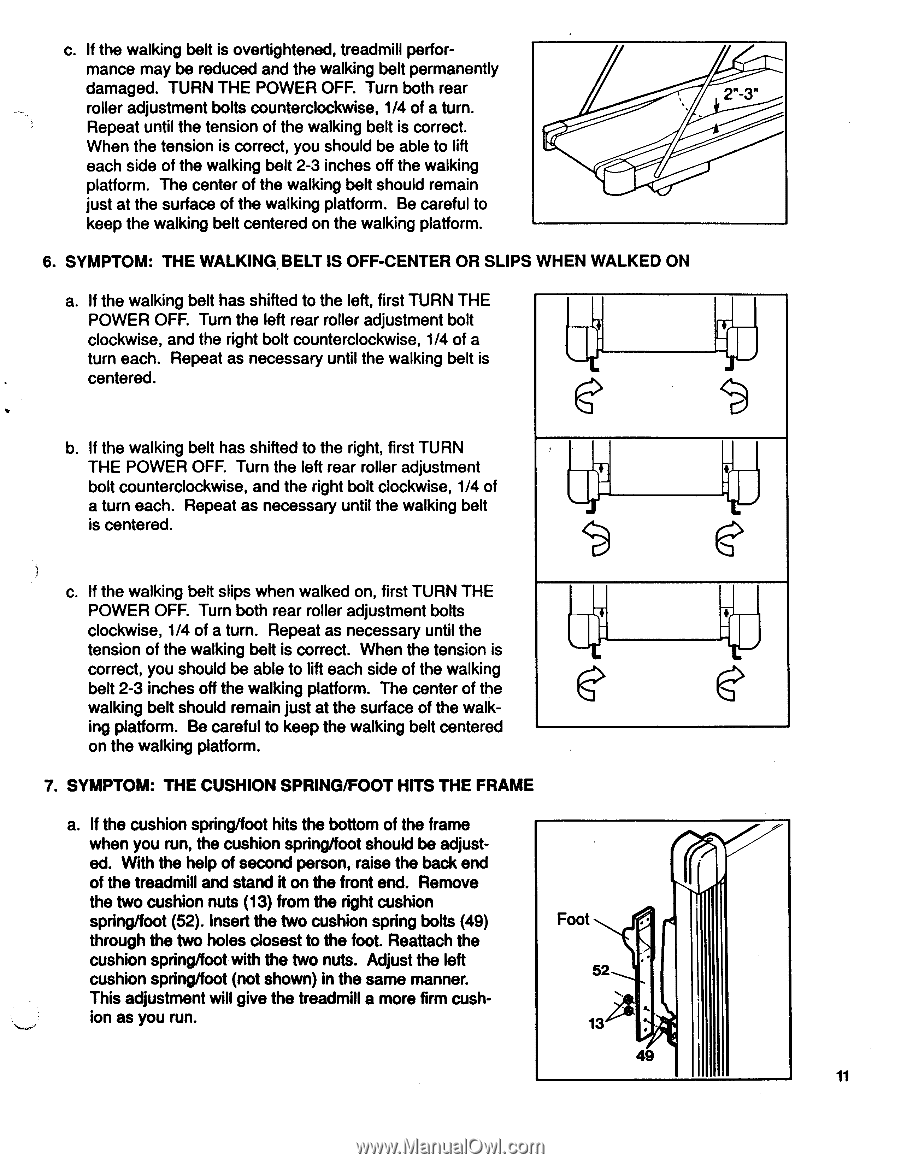
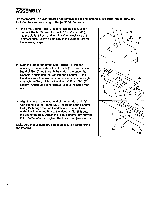
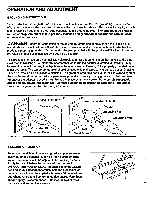
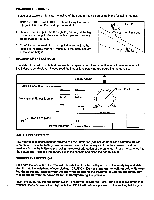
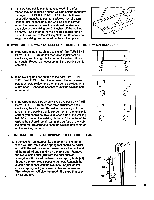
c. If the walking belt is overtightened, treadmill performance may be reduced and the walking belt permanently damaged. TURN THE POWER OFF. Turn both rear roller adjustment bolts counterclockwise, 1/4 of a turn. Repeat until the tension of the walking belt is correct. When the tension is correct, you should be able to lift each side of the walking belt 2-3 inches off the walking platform. The center of the walking belt should remain just at the surface of the walking platform. Be careful to keep the walking belt centered on the walking platform. 6. SYMPTOM: THE WALKING BELT IS OFF-CENTER OR SLIPS WHEN WALKED ON a. If the walking belt has shifted to the left, first TURN THE POWER OFF. Turn the left rear roller adjustment bolt clockwise, and the right bolt counterclockwise, 1/4 of a turn each. Repeat as necessary until the walking belt is centered. 2"-3" b. If the walking belt has shifted to the right, first TURN THE POWER OFF. Turn the left rear roller adjustment bolt counterclockwise, and the right bolt clockwise, 1/4 of a turn each. Repeat as necessary until the walking belt is centered. c. If the walking belt slips when walked on, first TURN THE POWER OFF. Turn both rear roller adjustment bolts clockwise, 1/4 of a turn. Repeat as necessary until the tension of the walking belt is correct. When the tension is correct, you should be able to lift each side of the walking belt 2-3 inches off the walking platform. The center of the walking belt should remain just at the surface of the walking platform. Be careful to keep the walking belt centered on the walking platform. 7. SYMPTOM: THE CUSHION SPRING/FOOT HITS THE FRAME a. If the cushion spring/foot hits the bottom of the frame when you run, the cushion spring/foot should be adjusted. With the help of second person, raise the back end of the treadmill and stand it on the front end. Remove the two cushion nuts (13) from the right cushion spring/foot (52). Insert the two cushion spring bolts (49) through the two holes closest to the foot. Reattach the cushion spring/foot with the two nuts. Adjust the left cushion spring/foot (not shown) in the same manner. This adjustment will give the treadmill a more firm cushion as you run. Foot fo lil 52 13 • 119 11
-
 1
1 -
2
-
3
-
4
-
5
-
 6
6 -
 7
7 -
 8
8 -
 9
9 -
 10
10 -
 11
11 -
 12
12 -
 13
13 -
 14
14 -
 15
15 -
 16
16
 |
 |