Weslo Cadence 5.2 Treadmill English Manual - Page 3
Assembly, Instructions, Treadmill, Adjustment
 |
View all Weslo Cadence 5.2 Treadmill manuals
Add to My Manuals
Save this manual to your list of manuals |
Page 3 highlights
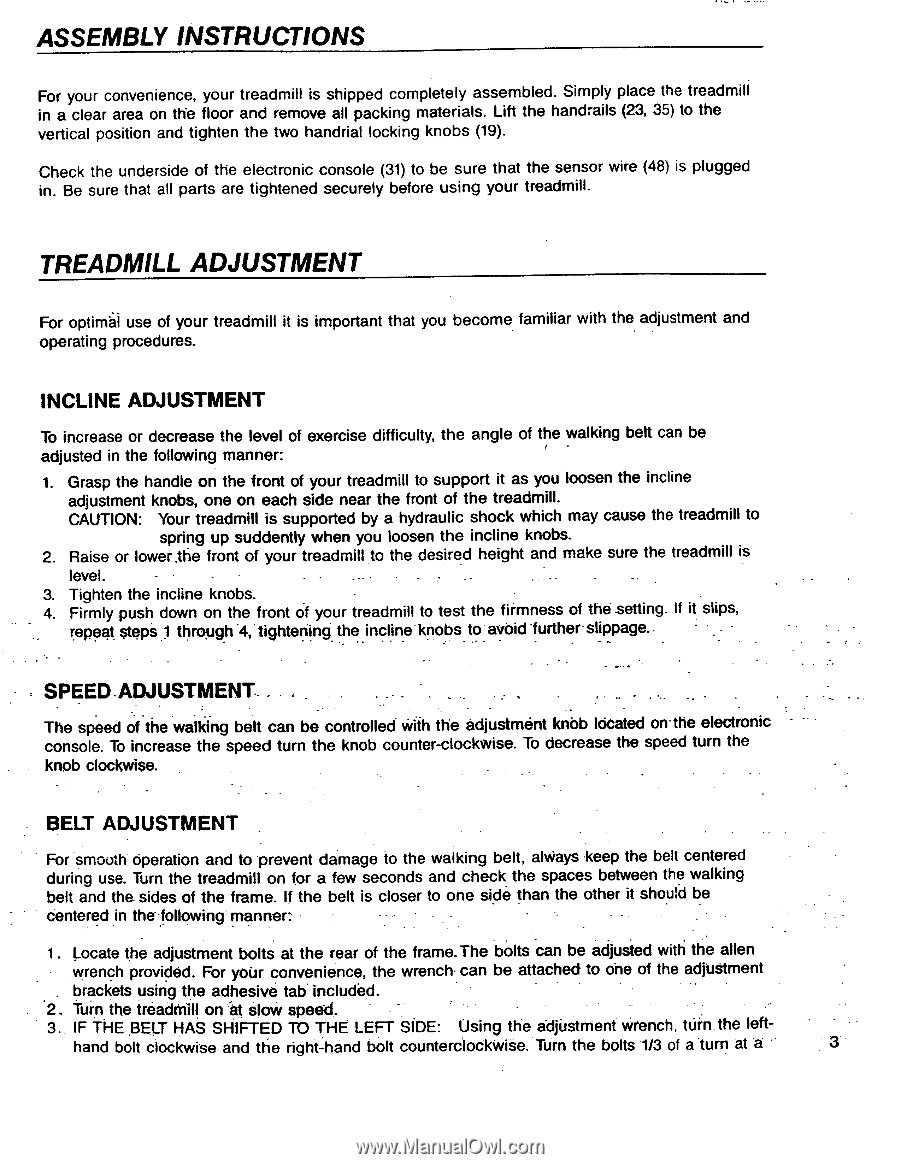
ASSEMBLY INSTRUCTIONS For your convenience, your treadmill is shipped completely assembled. Simply place the treadmill in a clear area on the floor and remove all packing materials. Lift the handrails (23, 35) to the vertical position and tighten the two handrial locking knobs (19). Check the underside of the electronic console (31) to be sure that the sensor wire (48) is plugged in. Be sure that all parts are tightened securely before using your treadmill. TREADMILL ADJUSTMENT For optimal use of your treadmill it is important that you become familiar with the adjustment and operating procedures. INCLINE ADJUSTMENT To increase or decrease the level of exercise difficulty, the angle of the walking belt can be adjusted in the following manner: 1. Grasp the handle on the front of your treadmill to support it as you loosen the incline adjustment knobs, one on each side near the front of the treadmill. CAUTION: Your treadmill is supported by a hydraulic shock which may cause the treadmill to spring up suddently when you loosen the incline knobs. 2. Raise or lower,Atie front of your treadmill to the desired height and make sure the treadmill is level. 3. Tighten the incline knobs. 4. Firmly push down on the front of your treadmill to test the firmness of the setting. If it slips, repeat stepS 1 through -4, tightening the incline knobs to avoid -further- slippage.. SPEED-ADJUSTMENT. . . : . The speed of the walking belt can be controlled with the adjustment knob Ideated on-the electronic console. To increase the speed turn the knob counter-clockwise. To decrease the speed turn the knob clockwise. BELT ADJUSTMENT For smooth operation and to prevent damage to the walking belt, alWays -keep the belt centered during use. Turn the treadmill on for a few seconds and check the spaces between the walking belt and the sides of the frame. If the belt is closer to one side than the other it should be centered in the- following manner: 1. Locate the adjustment bolts at the rear of the frame.The bolts can be adjusted with the alien wrench provided. For your convenience, the wrench- can be attached to one of the adjustment . brackets using the adhesive tab included. 2. Turn the treadMill on at slow speed. 3.. IF THE BELT HAS SHIFTED TO THE LEFT SIDE: Using the adjustment wrench, turn the left- hand bolt clockwise and the right-hand bolt counterciockwise. Turn the bolts 1/3 of alum at a 3
-
 1
1 -
 2
2 -
 3
3 -
 4
4 -
 5
5 -
 6
6 -
 7
7 -
 8
8 -
 9
9 -
10
-
11
-
12
 |
 |