Weslo Cadence 910 User Manual - Page 8
Caution
 |
View all Weslo Cadence 910 manuals
Add to My Manuals
Save this manual to your list of manuals |
Page 8 highlights
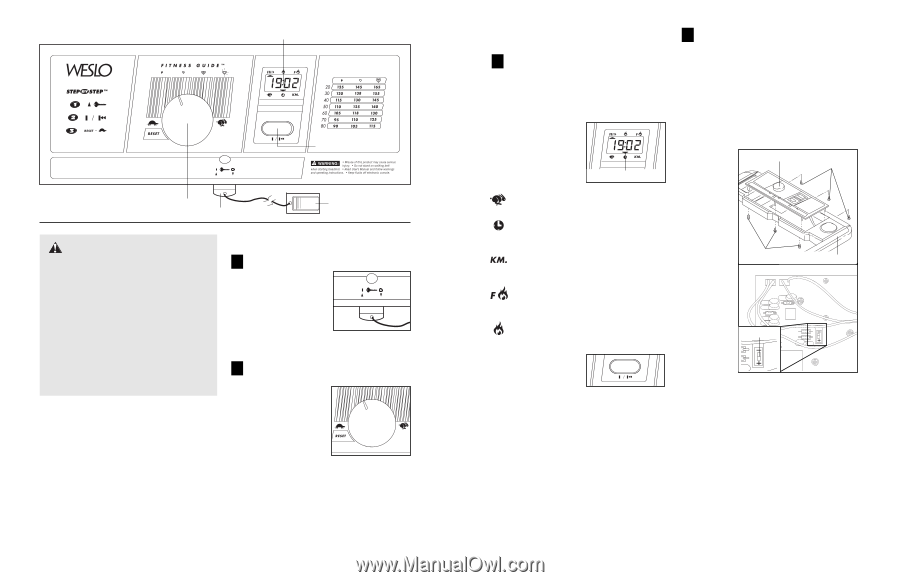
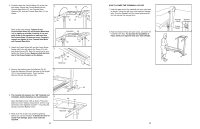
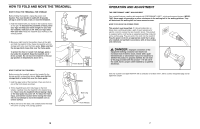
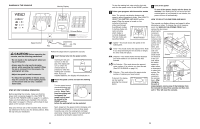
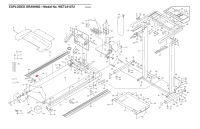
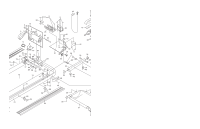
DIAGRAM OF THE CONSOLE Monitor Display On/reset Button Speed Control Clip Key CAUTION: Before operating the console, read the following precautions. ¥ Do not stand on the walking belt when turning on the power. ¥ Always wear the clip (see the drawing above) whilst operating the treadmill. When the key is removed from the console, the walking belt will stop. ¥ Adjust the speed in small increments. ¥ To reduce the possibility of electric shock, keep the console dry. Avoid spilling liquids on the console and use only a sealable water bottle. STEP BY STEP CONSOLE OPERATION Before operating the console, make sure that the power cord is properly plugged in. (See HOW TO PLUG IN THE POWER CORD on page 7.) In addition, make sure that batteries are installed in the console. (See step 6 on page 6.) If there is a thin sheet of clear plastic on the console, remove it. Step onto the foot rails of the treadmill. Next, find the clip attached to the key (see the drawing above). Slide the clip onto your waistband. Follow the steps below to operate the console. 1 Insert the key fully into the power switch. Inserting the key will not turn on the display. The display will turn on when the on/reset button is pressed or when the walking belt is started. Note: If you just installed batteries, the display will already be on. 2 Reset the speed control and start the walking belt. Turn the speed control counterclockwise until it stops at the RESET position. Note: Each time the walking belt is stopped, the speed control must be turned to the RESET position before the walking belt can be restarted. Next, slowly turn the speed control clockwise until the walking belt begins to move at slow speed. Carefully step onto the walking belt and begin exercising. Change the speed of the walking belt as desired by turning the speed control. 8 To stop the walking belt, step onto the foot rails and turn the speed control to the RESET position. 3 Follow your progress with the monitor modes Note: The console can display distance and speed in either kilometres or miles. (See HOW TO SELECT KILOMETRES AND MILES on this page.) When the power is turned on, the console will automat- ically scan through five different modes. A flashing mode indi- cator will show which mode is currently displayed. The five modes are described below. Mode Indicator SpeedÑThis mode shows the speed of the walking belt. TimeÑThis mode shows the elapsed time. Note: If you stop exercising for ten seconds or longer, the time mode will pause. DistanceÑThis mode shows the total distance you have walked or run since the key was inserted. Fat CaloriesÑThis mode shows the approximate number of fat calories you have burned. (See FAT BURNING on page 14.) CaloriesÑThis mode shows the approximate number of calories you have burned. If desired, the display can be reset by pressing the on/reset button. 4 Turn off the power To turn off the power, simply wait for about six minutes. If the walking belt is not moved and the on/reset button is not pressed for six minutes, the power will turn off automatically. HOW TO SELECT KILOMETRES AND MILES The console can display distance and speed in either kilometres or miles. To change the unit of measure- ment, first UNPLUG THE POWER CORD. Next, remove the six screws attaching the console to the console Console Screws base. Lift the console a few inches, being careful not to pull on the wires, and turn the con- sole over. Locate the small switch on the back Screws Console Base of the con- sole. Move the switch upward to select miles, or downward to select kilo- metres. Reattach the Switch console to the console base. After changing the unit of measurement, remove one of the batteries from the console for about five seconds and then rein- sert it. This will reset the console. 9
-
 1
1 -
2
-
 3
3 -
 4
4 -
 5
5 -
 6
6 -
 7
7 -
 8
8 -
 9
9 -
 10
10 -
 11
11
 |
 |