Weslo Cadence 925 Treadmill English Manual - Page 6
Frame 21 with two Frame Guide Screws 44
 |
View all Weslo Cadence 925 Treadmill manuals
Add to My Manuals
Save this manual to your list of manuals |
Page 6 highlights
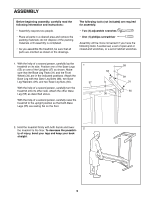
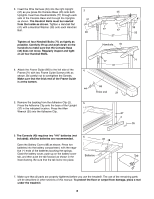
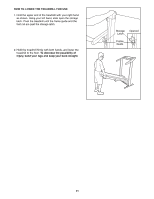
3. Insert the Wire Harness (53) into the right Upright (37) as you press the Console Base (45) onto both Uprights. Insert two Handrail Bolts (77) through each side of the Console Base and through the Uprights as shown. The Handrail Bolts must be inserted from the inside as shown. Tighten a Handrail Nut (41) with a Handrail Washer (39) onto each Handrail Bolt. 3 41 39 Tighten all four Handrail Bolts (77) as tightly as possible. Carefully lift up and push down on the handrails to make sure that the Console Base (45) does not move. Regularly inspect and tighten all four Handrail Bolts. 4. Attach the Frame Guide (66) to the left side of the 4 Frame (21) with two Frame Guide Screws (44) as shown. Be careful not to overtighten the Screws. Make sure that the thick end of the Frame Guide is at the bottom. 44 45 77 77 37 Handrails 45 77 37 66 Thick end 21 5. Remove the backing from the Adhesive Clip (2). 5 Press the Adhesive Clip onto the base of the Upright (37) in the indicated location. Press the Allen Wrench (35) into the Adhesive Clip. 37 2 41 39 53 77 35 6. The Console (49) requires two "AA" batteries (not 6 included); alkaline batteries are recommended. 49 48 Open the Battery Cover (48) as shown. Press two batteries into the battery compartment, with the nega- tive (Ð) ends of the batteries touching the springs. Close the battery cover, push up on the battery cover tab, and then push the tab forward as shown in the Batteries Tab inset drawing. Be sure that the tab locks into place. 7. Make sure that all parts are properly tightened before you use the treadmill. The use of the remaining parts will be described in other sections of this manual. To protect the floor or carpet from damage, place a mat under the treadmill. 6
-
 1
1 -
 2
2 -
 3
3 -
 4
4 -
 5
5 -
 6
6 -
 7
7 -
 8
8 -
 9
9 -
 10
10 -
 11
11 -
 12
12 -
13
-
14
-
15
-
16
-
17
-
18
 |
 |
