Weslo Cadence Ex16 Treadmill English Manual - Page 10
How To Fold And Move The Treadmill
 |
View all Weslo Cadence Ex16 Treadmill manuals
Add to My Manuals
Save this manual to your list of manuals |
Page 10 highlights
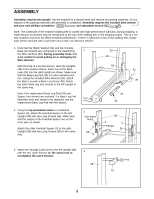
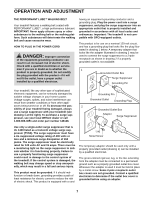
HANDRAIL HEIGHT ADJUSTMENT The Handrails (4, 32) can be adjusted to either of two heights. Before adjusting the Handrails, remove the key and unplug the power cord. Remove the four Console Screws (5). While a second person holds the Console Base (87), remove the Handrail Bolts (1), Handrail Washers (80), and Internal Washers (2). Raise or lower the Handrails (4, 32) to the desired height, being careful not to damage the Wire Harness (53). Reattach the Handrails with the Handrail Bolts, Handrail Washers, and Internal Washers. (Important: If you are 5' 8" or taller, use the lower two holes in the Handrails; if you are shorter than 5' 8", use the upper two holes. Make sure that both Handrails are at the same height. Do not tighten the Handrail Bolts yet. Always attach each Handrail with two Handrail Bolts.) Reattach the Console Base (87) (see assembly step 4 on page 6). Then, tighten the four Handrail Bolts. Insert a Handrail Cap (70) into the unused hole in each Handrail (4, 32). 87 5 5 4 32 38 2 53 80 2 1 80 1 70 70 HOW TO FOLD AND MOVE THE TREADMILL HOW TO FOLD THE TREADMILL FOR STORAGE Before folding the treadmill, unplug the power cord. CAUTION: You must be able to safely lift 45 pounds (20 kg) in order to raise, lower, or move the treadmill. 1. Hold the treadmill with your hands in the locations shown at the right. To decrease the possibility of injury, bend your legs and keep your back straight. As you raise the treadmill, make sure to lift with your legs rather than your back. Raise the treadmill about halfway to the vertical position. 2. Move your right hand to the position shown and hold the treadmill firmly. Using your left thumb, press the storage latch and hold it. Pivot the treadmill until the frame and foot rail are past the storage latch. Close the storage latch over the catch. Make sure that the storage latch is fully engaged over the catch. To protect the floor or carpet from damage, place a mat under the treadmill. Keep the treadmill out of direct sunlight. Do not leave the treadmill in the storage position in temperatures above 85° Fahrenheit. 10 Storage Latch Catch Closed
-
 1
1 -
2
-
3
-
4
-
 5
5 -
 6
6 -
 7
7 -
 8
8 -
 9
9 -
 10
10 -
 11
11 -
 12
12 -
 13
13 -
 14
14 -
 15
15 -
16
-
17
-
18
-
19
 |
 |
