Weslo Cadence Ex16 Treadmill English Manual - Page 6
and the Console Base. After all four Console Screws
 |
View all Weslo Cadence Ex16 Treadmill manuals
Add to My Manuals
Save this manual to your list of manuals |
Page 6 highlights
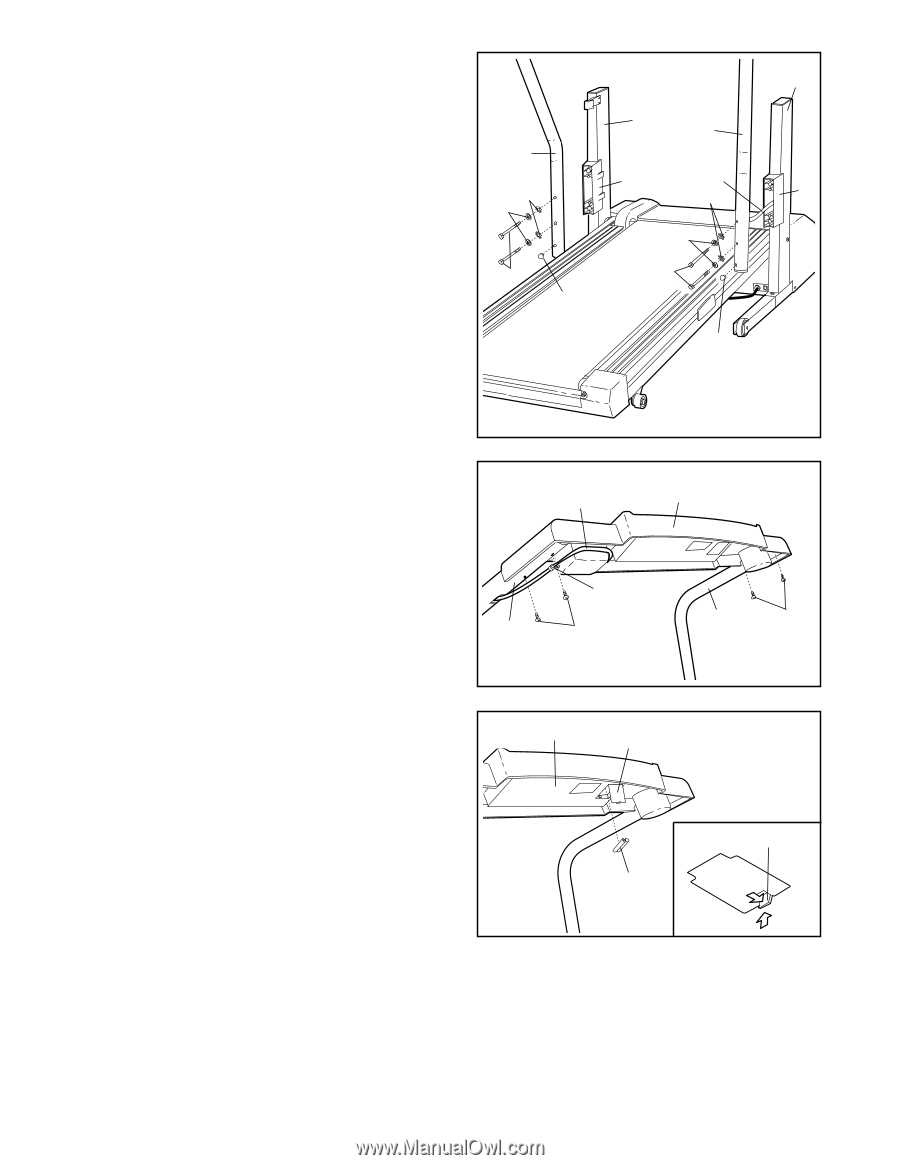
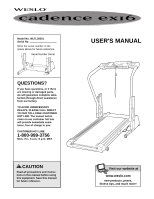
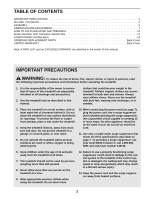
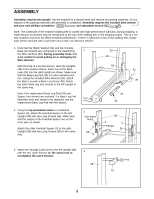
4. Attach the Left Handrail (4) to the left Handrail Spacer 4 (3) and the left Upright (38) with two Handrail Bolts (1), 38 two Handrail Washers (80), and two Internal Washers (2) as shown. Do not tighten the Handrail Bolts yet. Note: If you are 5' 8" or taller, use the lower two 38 32 holes in the Left Handrail; if you are shorter than 5' 8", use the upper two holes. Refer to drawing 5. Have a second person hold the Console Base (87) near the Right Handrail (32). Feed 4 2 80 3 53 2 3 the excess Wire Harness (53) into the upper end of 80 the right Handrail, while pulling the excess from the bottom of the Handrail. Then, insert the excess Wire 1 1 Harness into the right Upright (38) (see drawing 4). 70 Attach the Right Handrail (32) to the right Handrail Spacer (3) and the right Upright (38) as described 70 above. Do not tighten the Handrail Bolts (1) yet. Insert a Handrail Cap (70) into the unused hole in each Handrail (4, 32). 5. Set the Console Base (87) on the Handrails (4, 32). Route the Wire Harness (53) as shown. Attach the 5 Wire Harness to the Right Handrail with the Wire 53 87 Harness Clip (13) and a Console Screw (5); do not tighten the Console Screw yet. Then, loosely thread the other three Console Screws (5) into the Handrails and the Console Base. After all four Console Screws are threaded, firmly tighten them; be careful not to 13 overtighten the Console Screws. Insert the excess Wire Harness into the Right Handrail. 32 5 4 5 Tighten the four Handrail Bolts (1) used in step 4. 6. The Console (87) requires two "AA" batteries (not 6 included); alkaline batteries are recommended. Open the Battery Cover (7) as shown. Press two batteries into the battery compartment, with the negative (-) ends of the batteries touching the springs. Close the battery cover, push up on the battery cover tab, and then push the tab forward as shown in the inset drawing. Be sure that the tab locks into place. 87 7 Battery Cover Tab Batteries 7. Make sure that all parts are tight before you use the treadmill. To protect the floor or carpet from damage, place a mat under the treadmill. 6
-
 1
1 -
 2
2 -
 3
3 -
 4
4 -
 5
5 -
 6
6 -
 7
7 -
 8
8 -
 9
9 -
 10
10 -
 11
11 -
 12
12 -
13
-
14
-
15
-
16
-
17
-
18
-
19
 |
 |