Weslo Momentum 410 Elliptical Uk Manual - Page 5
Left sticker. Attach the Left Pedal to the Left Pedal
 |
View all Weslo Momentum 410 Elliptical manuals
Add to My Manuals
Save this manual to your list of manuals |
Page 5 highlights
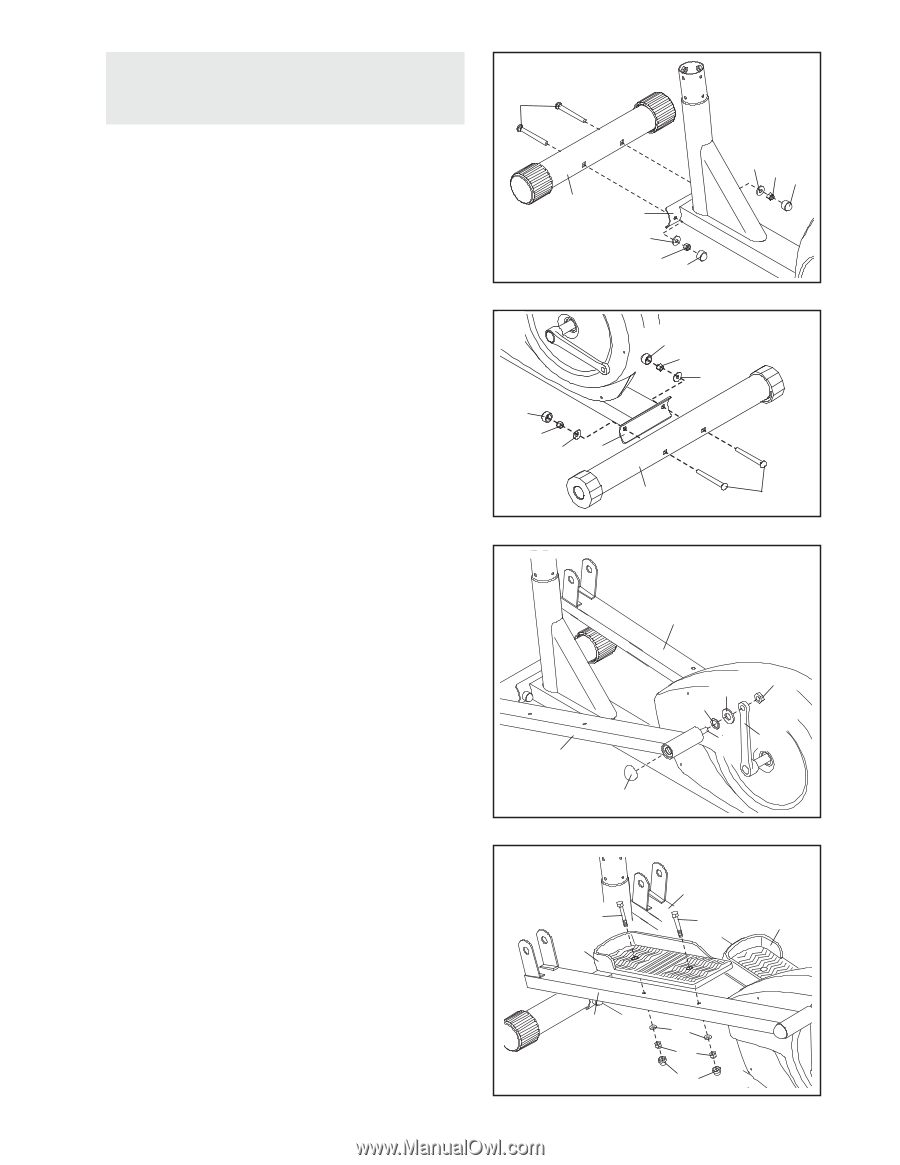
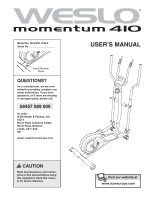
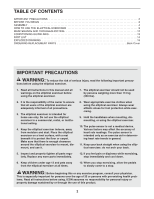
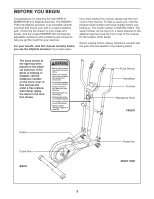
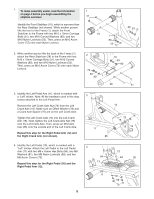
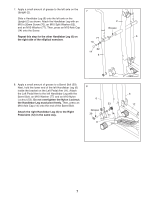
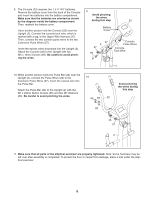
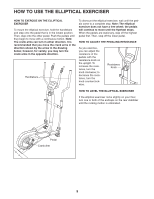
1. To make assembly easier, read the information on page 4 before you begin assembling the elliptical exerciser. Identify the Front Stabilizer (10), which is narrower than the Rear Stabilizer (not shown). While another person lifts the front of the Frame (1), attach the Front Stabilizer to the Frame with two M10 x 70mm Carriage Bolts (51), two M10 Curved Washers (80), and two M10 Nylon Locknuts (53). Then, press an M10 Acorn Cover (72) onto each Nylon Locknut. 2. While another person lifts the back of the Frame (1), attach the Rear Stabilizer (28) to the Frame with two M10 x 70mm Carriage Bolts (51), two M10 Curved Washers (80), and two M10 Nylon Locknuts (53). Then, press an M10 Acorn Cover (72) onto each Nylon Locknut. 1 51 10 1 80 53 72 80 53 72 2 72 53 80 1 72 53 80 28 51 3. Identify the Left Pedal Arm (11), which is marked with a "Left" sticker. Note: All the hardware used in this step comes attached to the Left Pedal Arm. Remove the Left Crank Axle Nut (76) from the Left Crank Axle (15). Make sure an Offset Washer (78) and a Crank Axle Spacer (75) are on the Left Crank Axle. Tighten the Left Crank Axle (15) into the Left Crank Arm (18). Next, tighten the Left Crank Axle Nut (76) onto the Left Crank Axle. Then, press an M12 Axle Cap (86) onto the outside end of the Left Crank Axle. Repeat this step for the Right Pedal Arm (12) and the Right Crank Arm (not shown). 3 11 12 76 75 78 15 18 86 4. Identify the Left Pedal (13), which is marked with a "Left" sticker. Attach the Left Pedal to the Left Pedal 4 Arm (11) with two M8 x 45mm Hex Bolts (84), two M8 Washers (81), two M8 Nylon Locknuts (58), and two M8 Acorn Covers (73). Repeat this step for the Right Pedal (30) and the Right Pedal Arm (12). 84 13 11 5 12 84 30 81 58 73
-
 1
1 -
 2
2 -
 3
3 -
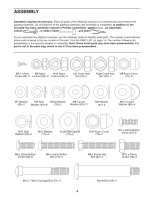 4
4 -
 5
5 -
 6
6 -
 7
7 -
 8
8 -
 9
9 -
 10
10 -
 11
11 -
12
-
13
-
14
-
15
-
16
 |
 |